WChat
WChat is a paid and premium WISECP addon. It is purchased in addition to the WISECP license. In order to use WChat, your WISECP version must be at least “3.1.8”.
To purchase the WChat addon, please visit the link below or go to “my.wisecp.com > License Details > Additional Services”.
Go to the Online Store : https://store.wisecp.com/en/wchat
Content Map:
- Installing
- Activating
- Use and Working Principle
- Settings and Configuration
- Selling Premium Support Service
- Visual Settings
- Embed Code
Installing
1) After purchasing the WChat addon, download your addon installation file and unzip it with any compression program (Winrar or 7-Zip) and extract it.
2) Access your WISECP software files via FTP and upload the extracted addon folder to the “/coremio/modules/Addons/” directory.
Activating
1) To activate the addon, please visit “Tools > Addons” from your admin area.
2) On the page that opens, find the “WChat” addon in the “Disabled Addons” section and click on the “Settings” button.
3) On the page that opens, there is only the "Access Control" field. Specify administrative privileges to grant access to the addon.
4) After defining the above information, click the “Save” button and then click the Enable button at the top of the page to activate the addon.
Use and Working Principle
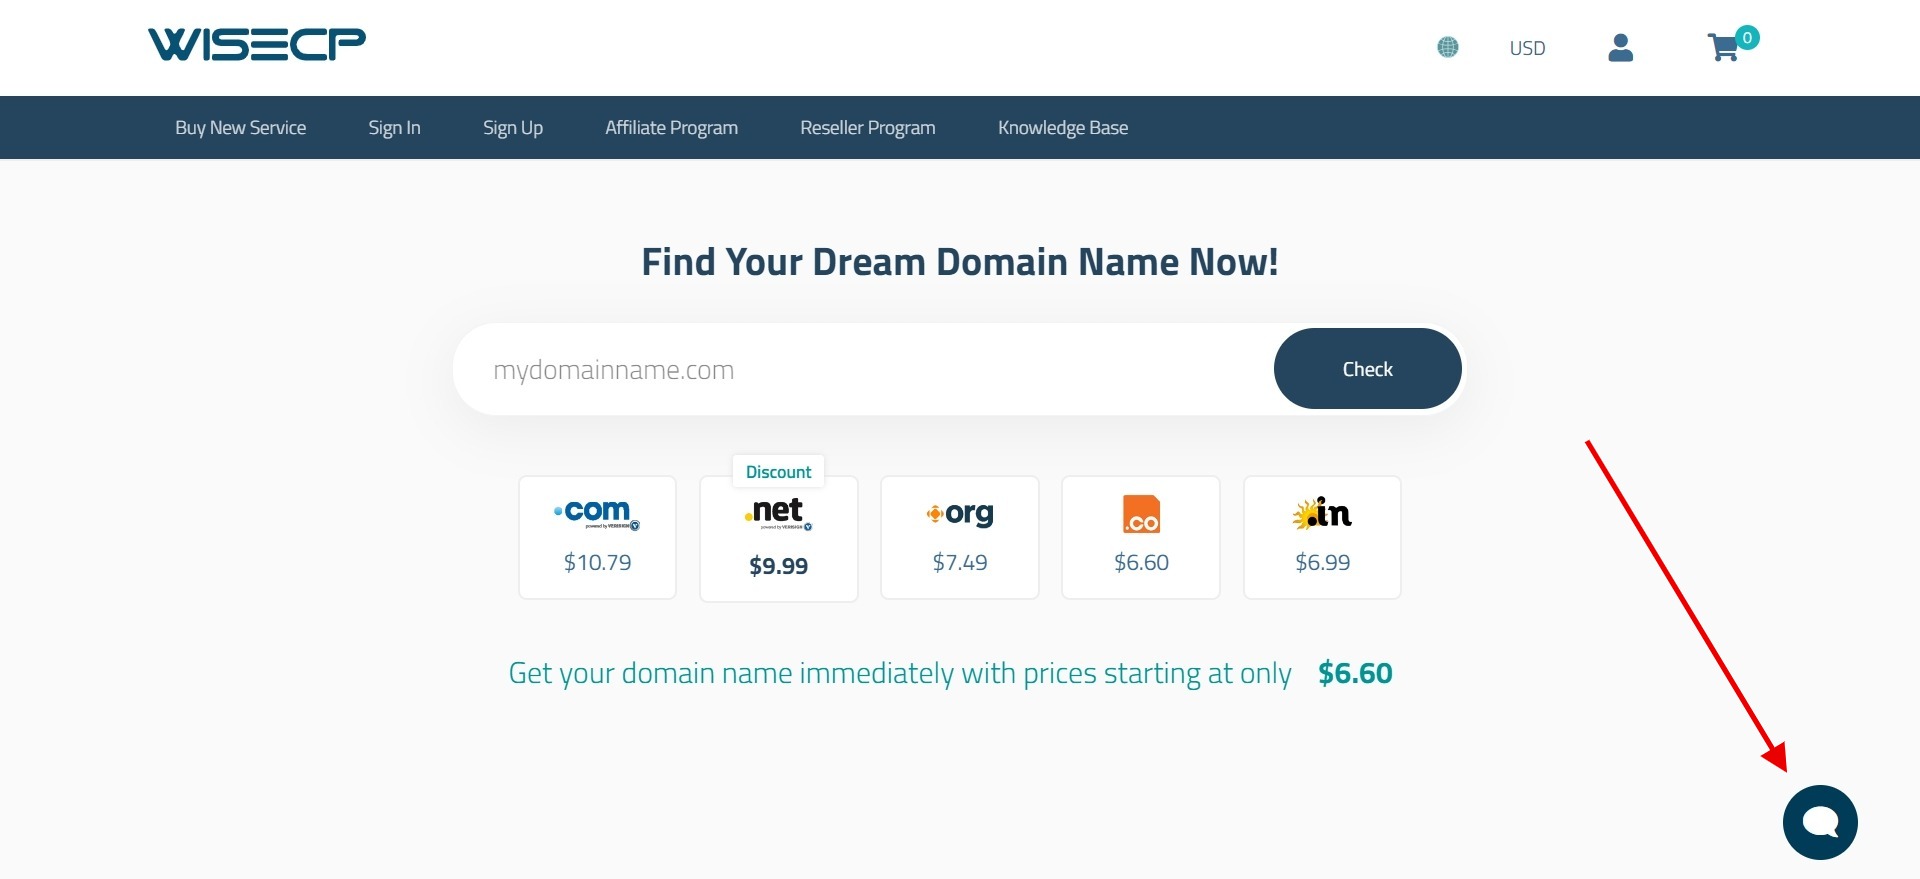
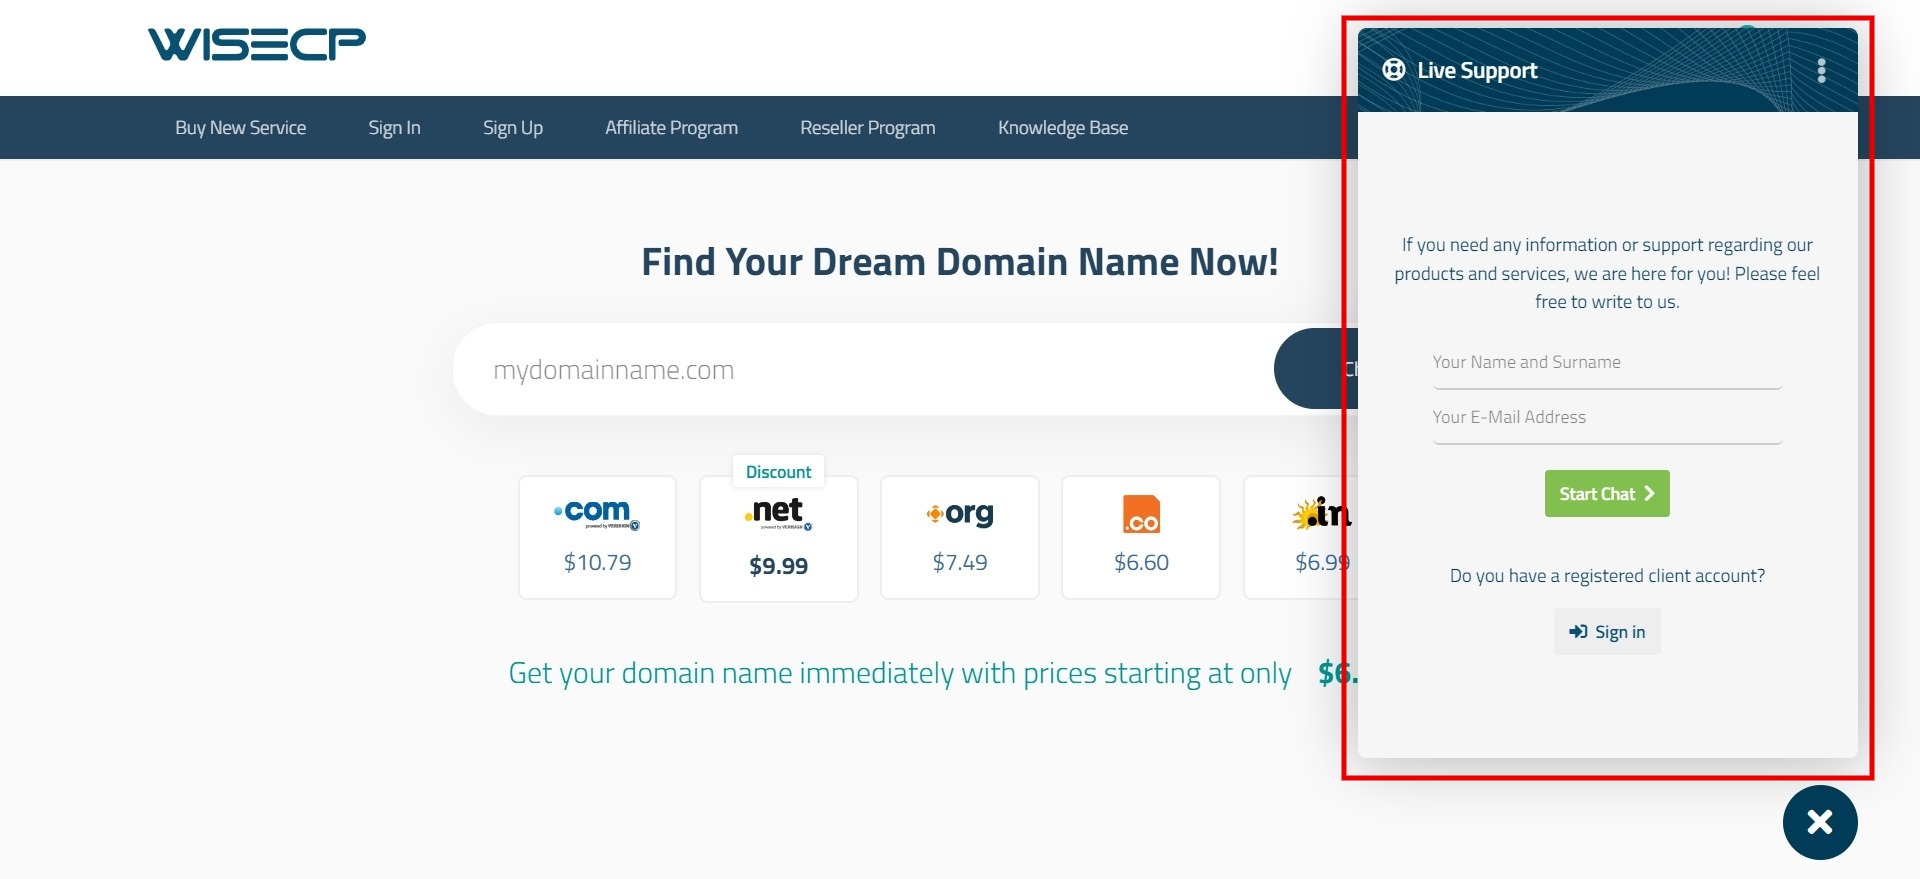
Once you activate and start using WChat, a chat window appears in the lower right corner of the client area of your WISECP system. Through this window, your clients or visitors can communicate with you quickly and effectively by starting a chat. Chats opened through the front interface of your website are processed and managed as a support ticket in the support tickets area of your admin area. While your customer messages you via live chat experience, you and your employees send responses through the systematic ticket system you are accustomed to.
Settings and Configuration
WChat has very advanced and customizable features. To configure WChat according to your wishes, please follow the steps below:
1) Go to “Support > WChat” in your admin area.
2) The page that opens contains the settings detailed below, and you can configure these settings according to your needs.
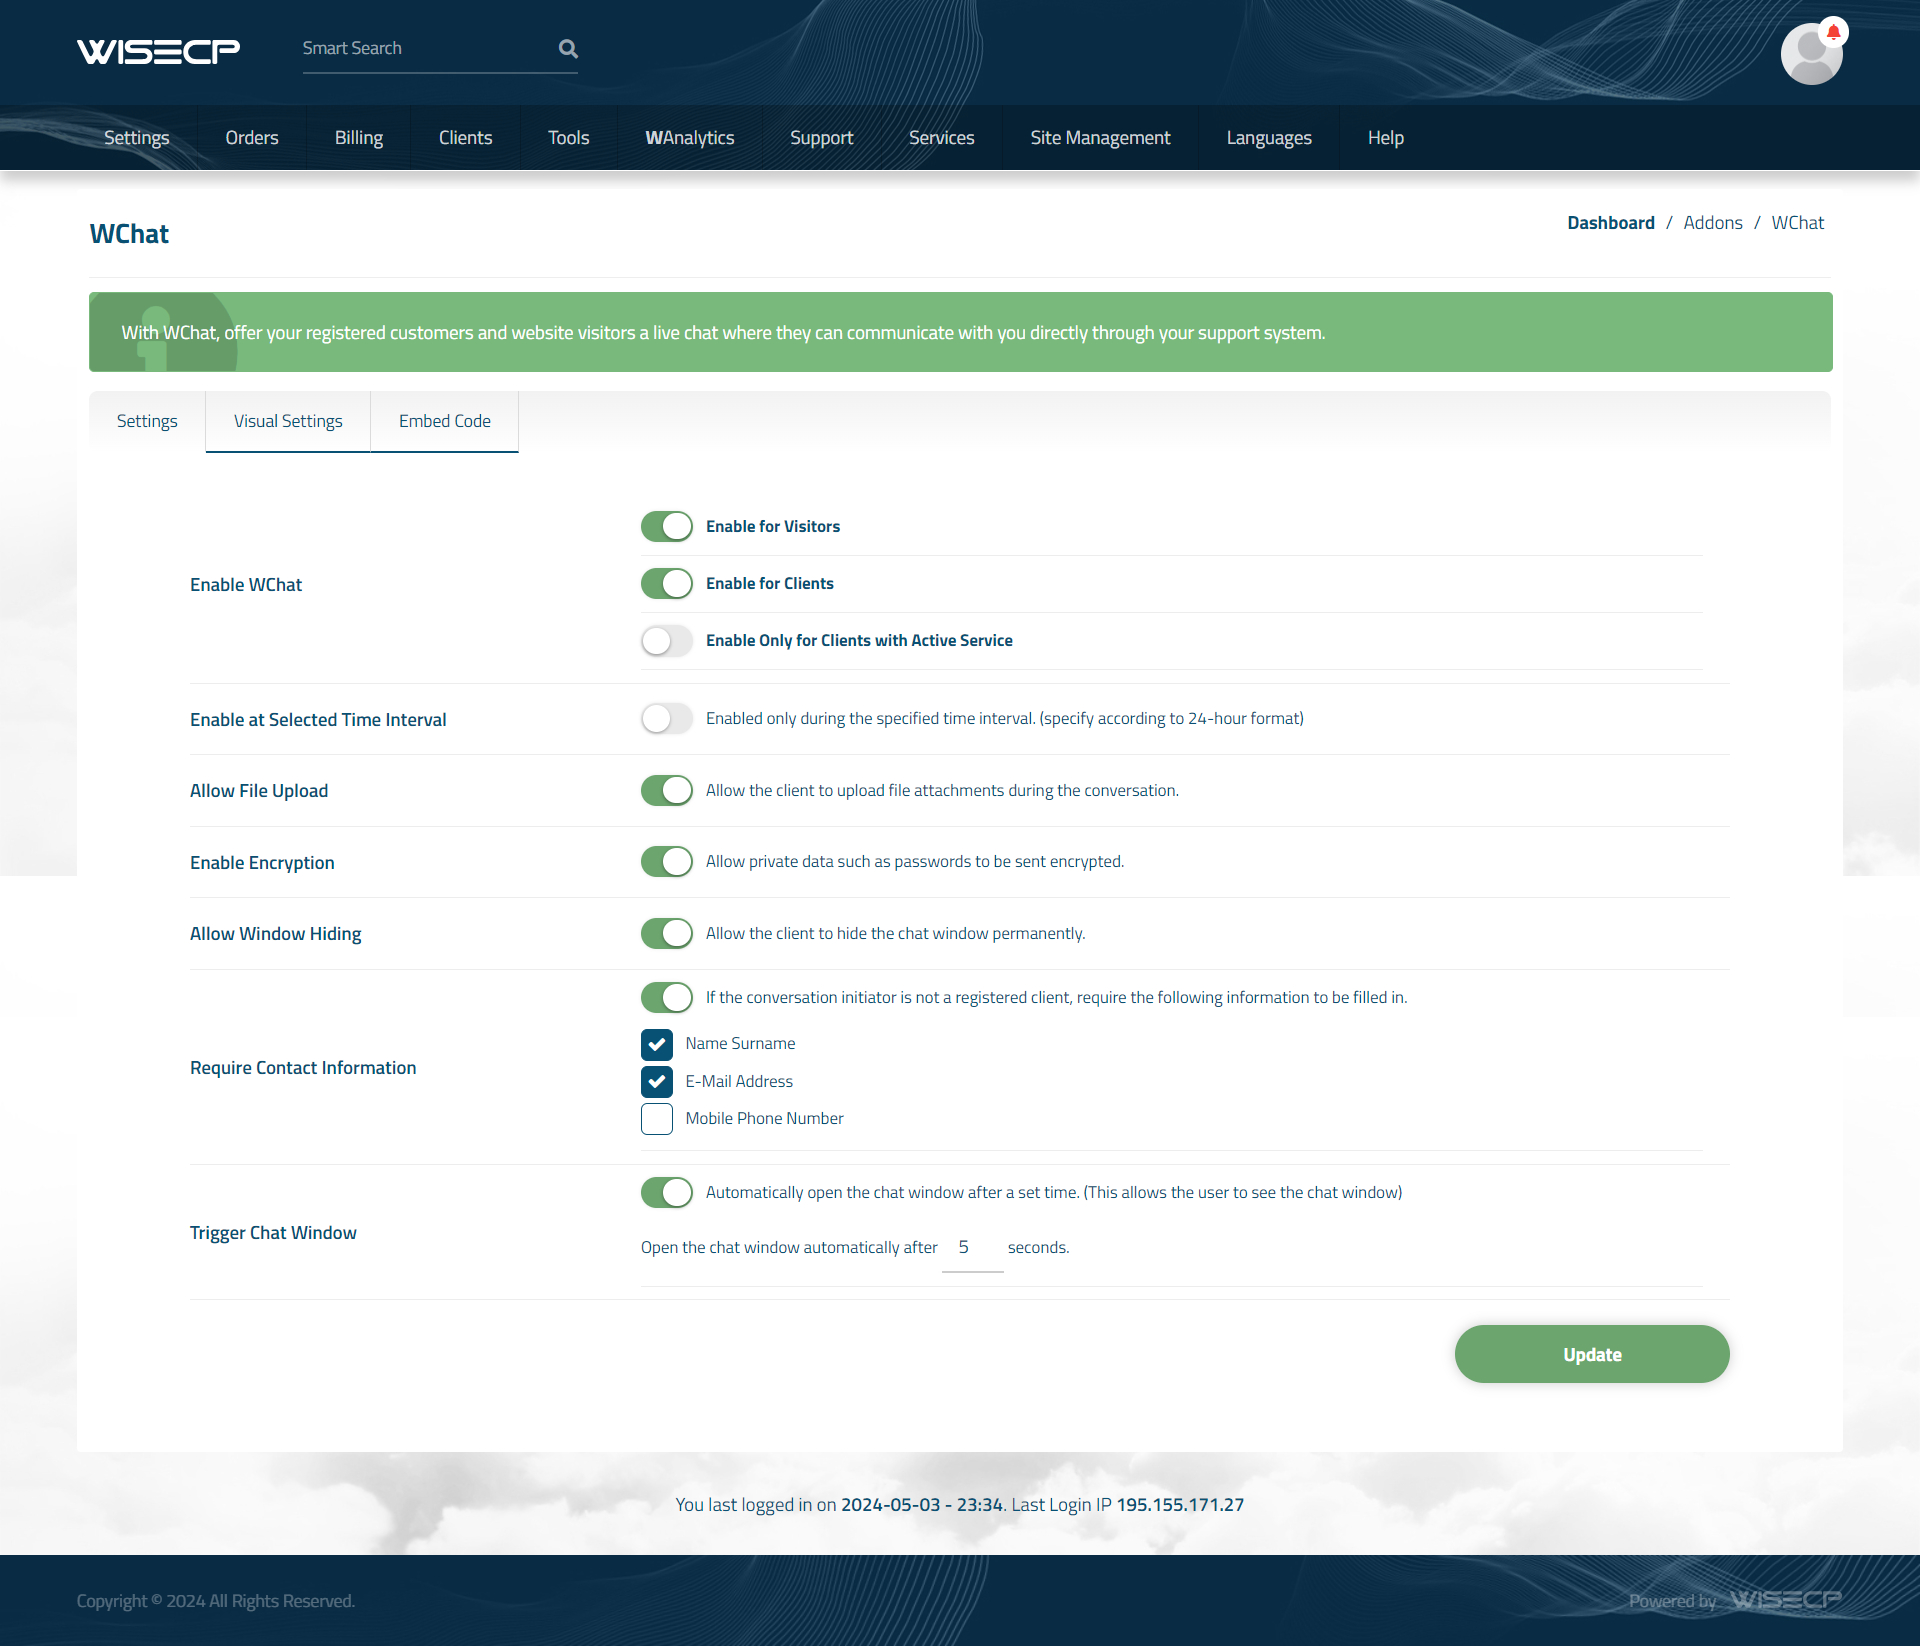
Enable WChat : You can choose in which situations WChat will be enabled. There are 3 different options.
- Enable for Visitors : You can enable the WChat system for your website visitors. This is an ideal choice for visitors who are not yet your customers and want to gain pre-purchase information.
- Enable for Clients : You can activate the WChat system for your registered customers. This is the ideal choice to provide faster and more effective communication to your existing registered customers.
- Enable Only for Clients with Active Service : You can activate WChat only for your customers with active service. This is an ideal choice to offer faster and more efficient communication to your active customers.
Enable at Selected Time Interval : You can set the WChat system to be activated only during your preferred hours. This way, you can automatically prevent live chat initiation during off-hours, when you are not online or available.
Allow File Upload : You can allow the person to upload a file during the conversation. In this way, your customers can send screenshots and similar files for faster and more effective communication.
Enable Encryption : In some cases, your customers may need to send data such as personal information, password, etc. In such cases, your customers can ensure that the message is sent and stored in an encrypted manner by using the “Encrypt This Message” feature in the message sending area of the chat window. When this function is used, data is securely encrypted using a strong decryption and stored in your database.
Allow Window Hiding : You can allow the person to permanently hide the chat window. When this function is used, browser cookies must be cleared before the chat window can be viewed by the person again.
Require Contact Information : If the person who wants to start a chat is not a registered customer, you can require the person to fill in some or all of the "Name Surname, E-Mail Address and Mobile Phone Number" information.
Trigger Chat Window : If you want the chat window to open automatically after a certain period of time, you can enable this function. This is an effective way to get noticed that live chat is available.
Selling Premium Support Service
The most distinctive and unique feature of WChat is that the live chat system can be enabled and displayed only for your customers who have a product or additional service that you specify. In this way, you can offer premium support service to your customers. Your customers can receive faster and priority support from you by purchasing premium support service with any product/service.
For example, you can create an additional service under the name "Premium Support" with monthly, 3-monthly, 6-monthly and annual payment periods and have your customer purchase it. In this way, customers who have the "Premium Support" service in their customer account can receive faster, priority and effective support from you by viewing the live chat window.
To sell premium support services, you can follow the steps below:
1) From your admin area, follow the path “Services > Service Management > Addons”.
2) On the page that opens, click the "Create new addon" button.
3) Define the options displayed on the page that opens, as given in the examples below, or by changing them as you wish. (You don't need to make any changes to any other fields except the ones below.)
Addon Name : Premium Support
Addon Description : Get fast, effective and prioritized premium support at live chat level.
Addon Group : Select a group you previously created. (You can create a group called “Additional Services”).
Option Type : In this field, mark “Radio Selection” and define the pricing periods according to which you want to offer the premium support service at the bottom. For example: Monthly $10 / 3 Months $25 / 6 Months $40 / Annual $90 etc.
Click on the “Create Addon” button.
4) In your admin area, follow the path “Support > WChat”.
5) On the page that opens, check the "Enable Only for Clients with Active Service" option in the "Enable WChat" field and select the "Premium Support" additional service you have created before.
6) Determine other settings according to your wishes and save the settings.
Now the WChat live chat window will only be displayed for customers who actively use the “Premium Support” additional service. (If the additional service "Premium Support" is passive, it will not be displayed in the customer area.)
If you wish, you can do the same process by creating a custom product group instead of creating additional services.
When you want to offer Premium Support service, the WChat system will only be available to your customers who have purchased Premium Support service. It cannot be used by visitors or registered customers at the same time.
Visual Settings
You can change the colors of the chat window and the background photo according to your own corporate colors and make them compatible with your corporate image.
To adjust visual settings, follow the steps below:
1) In your admin area, follow the path “Support > WChat > Visual Settings”.
2) The page that opens contains the following fields, and you can define these fields as you wish.
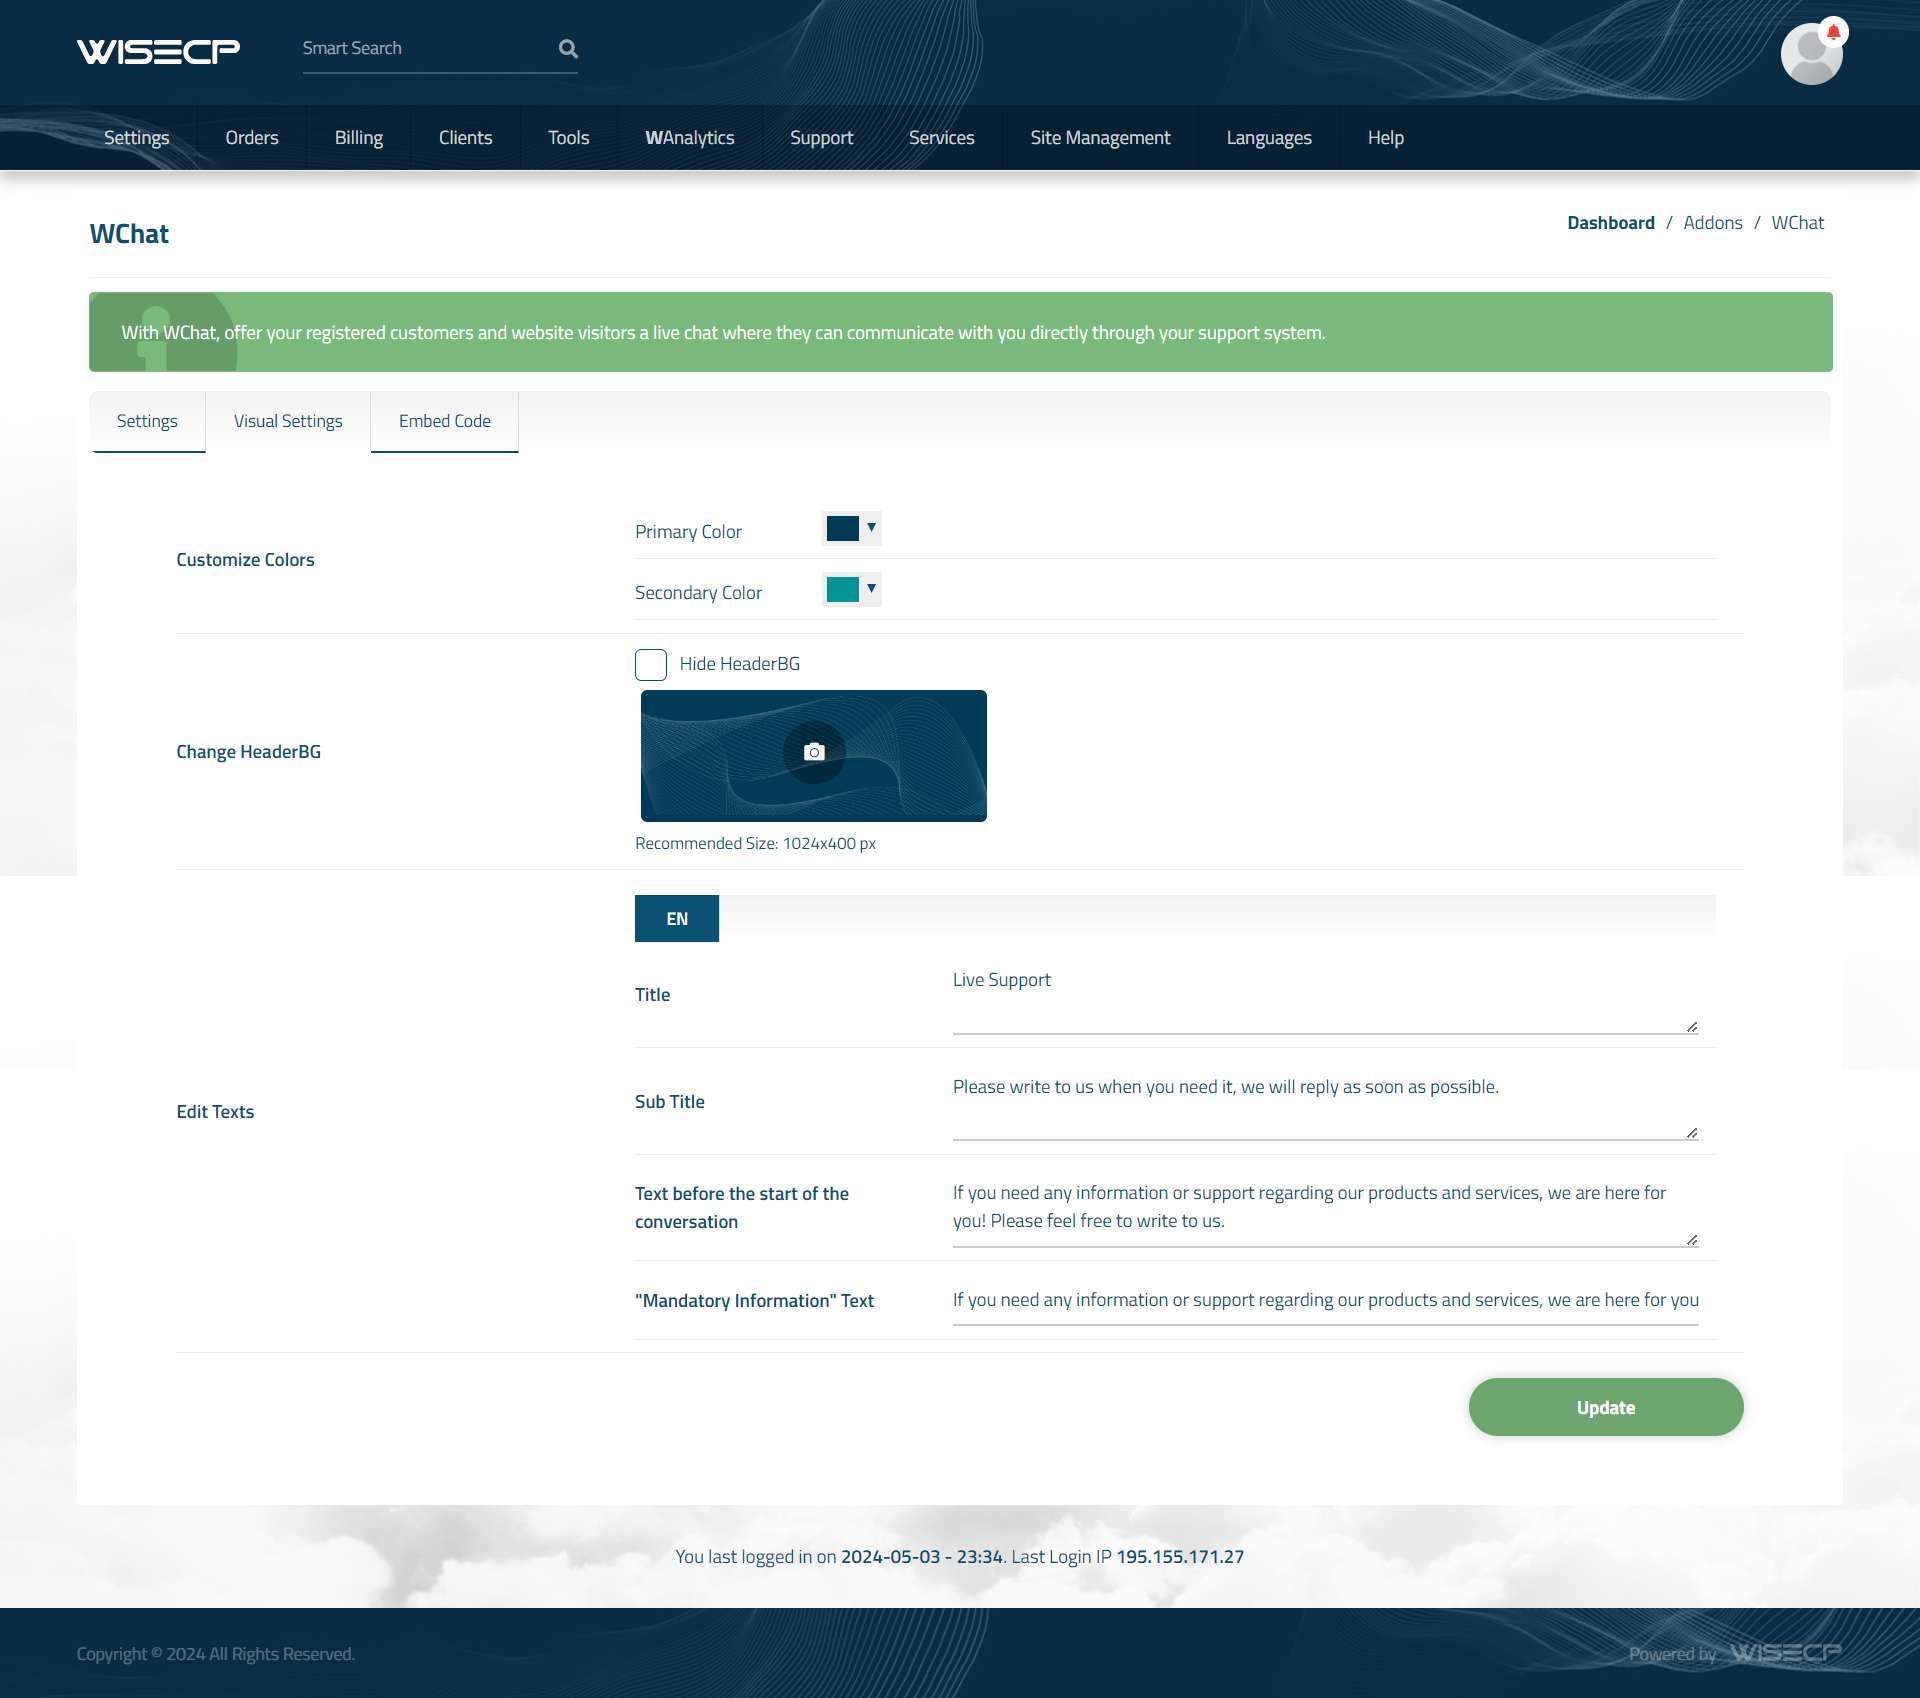
Customize Colors : There are two different color determination fields in this area: primary and secondary. You can define it to match your corporate colors.
Change HeaderBG : You can change the image displayed at the top of the chat window to your own wishes.
Edit Texts : You can change the texts that are displayed by default in the chat window to your own wishes.
Embed Code
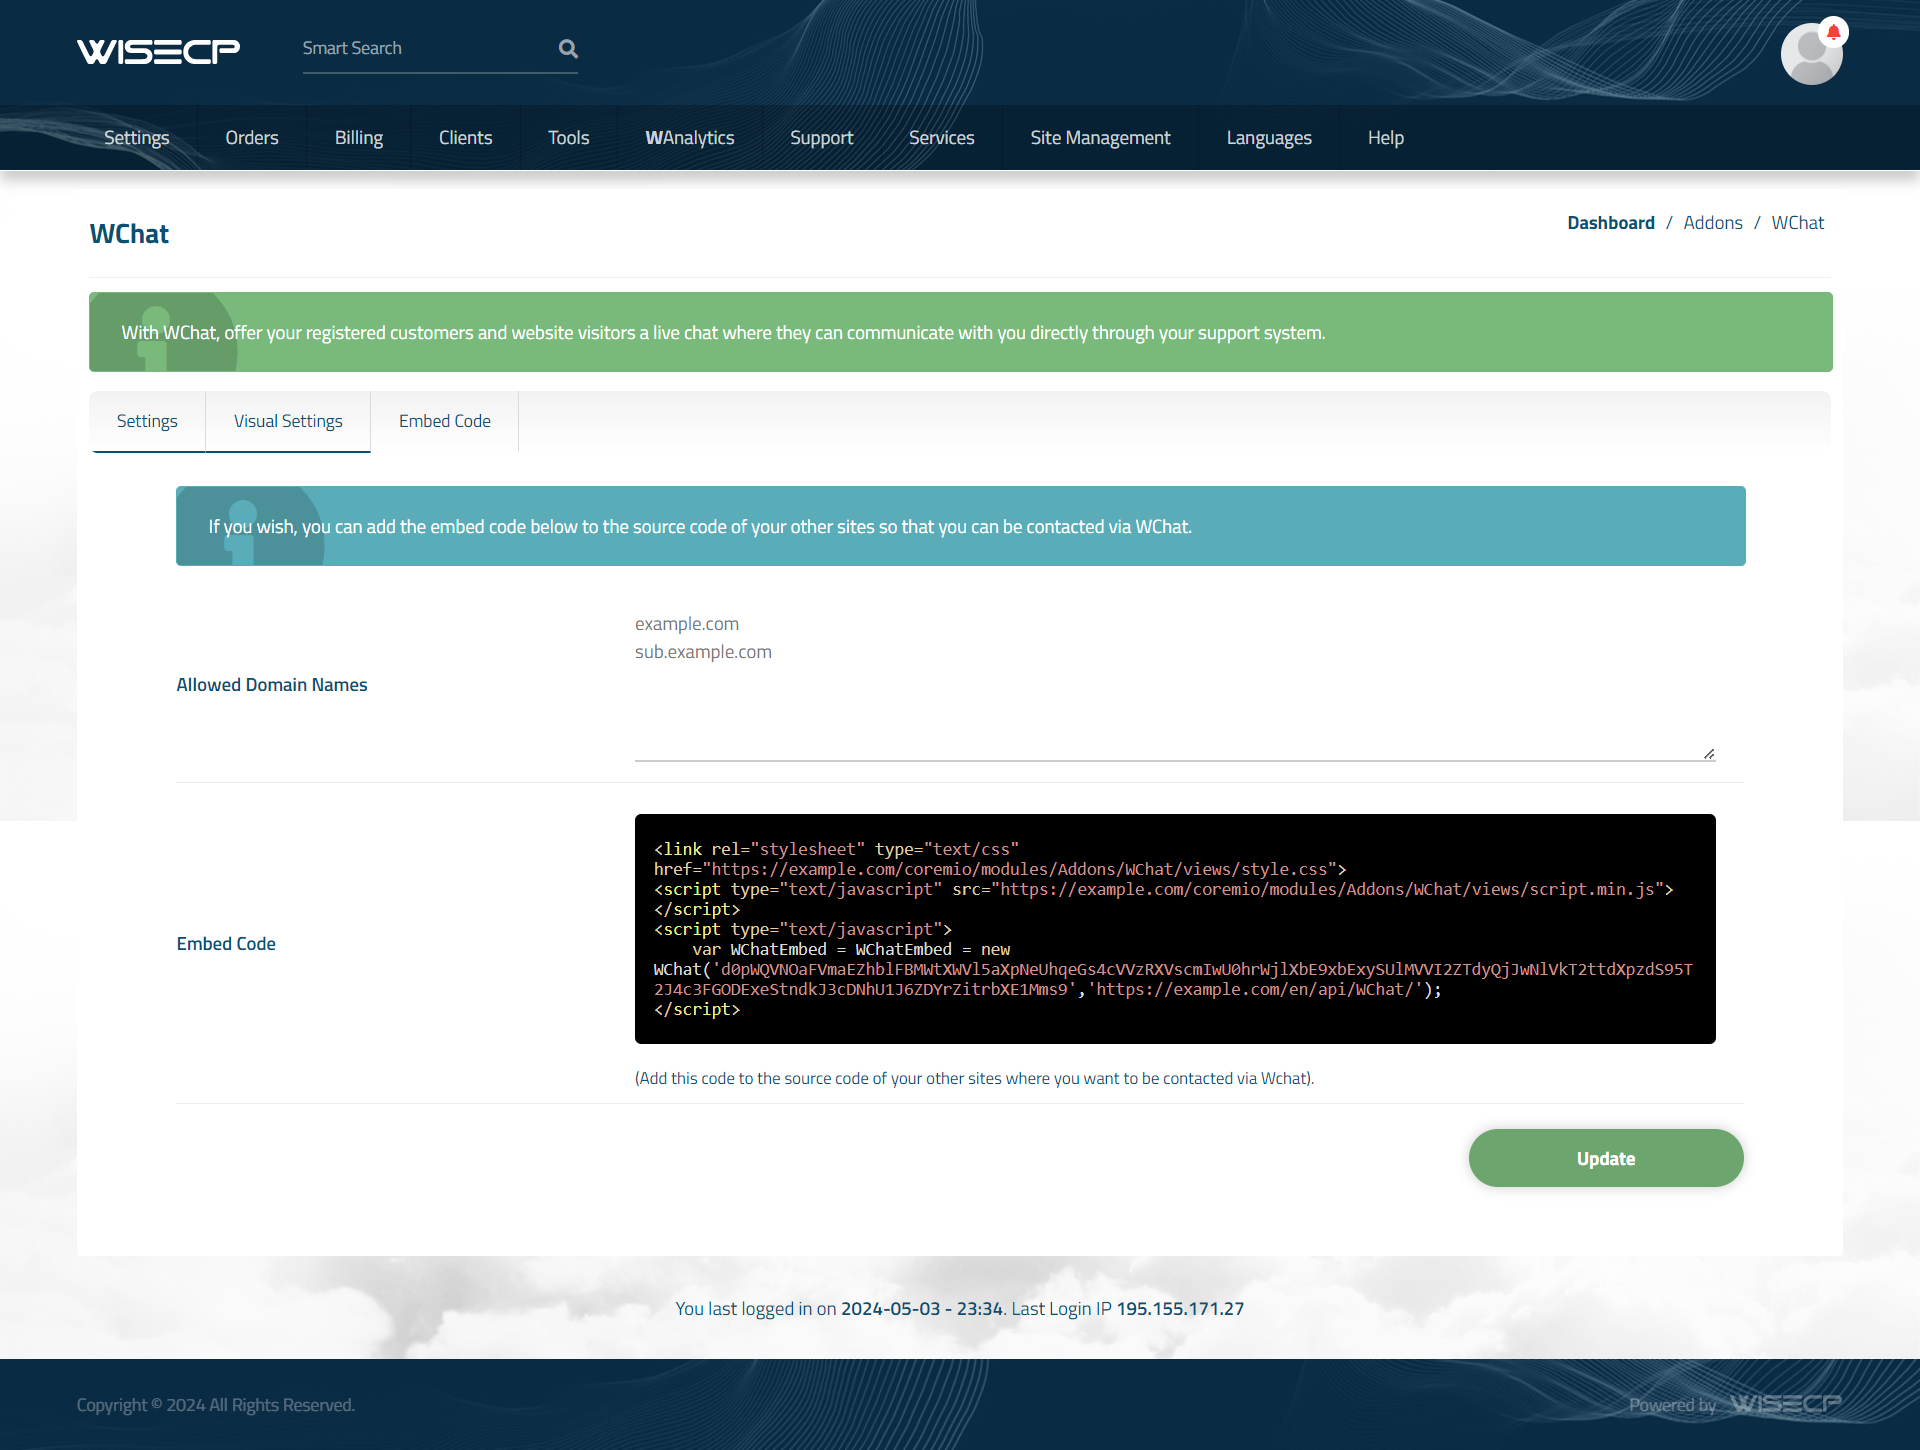
With the integration feature, another advanced feature in WChat, you can add your live chat application from your website to your blog, from your e-commerce platforms to the software you offer, and manage all chats through your WISECP system.
Follow the steps below to add your live chat window to any website.
1) In your admin area, follow the path “Support > WChat > Embed Code”.
2) The page that opens contains the following fields, and you can define these fields as you wish.
Allowed Domain Names : If you want to define the domains that will run your live chat window, you can add multiple domains in this field. Each domain name must be defined one after the other and must be added as “example.com”. If nothing is defined, the live chat window can be run under any website.
Embed Code : This area contains the embed codes for the live chat window. Add these codes to the source code of the website where you want your live chat window to be displayed without any editing. The embed code must be added before the “</body>” tag in the source code.

 Welcome to the Usage Guide