AI Assistant
AI Assistant is a paid and premium WISECP addon. It is purchased in addition to the WISECP license. In order to use AI Assistant, your WISECP version must be at least “3.1.8”.
To purchase the AI Assistant addon, please visit the link below or go to “my.wisecp.com > License Details > Additional Services”.
Go to the Online Store : https://store.wisecp.com/en/ai-assistant
Content Map :
- Installing
- Activating
- Use and Working Principle
- Using AI Assistant in Support Tickets
- Using AI Assistant in Contact Form Messages
- Advanced Auto Ticket Reply Feature
Installing
1) After purchasing the AI Assistant addon, download your addon installation file and unzip it with any compression program (Winrar or 7-Zip) and extract it.
2) Access your WISECP software files via FTP and upload the extracted addon folder to the “/coremio/modules/Addons/” directory.
Activating
1) To activate the addon, please visit “Tools > Addons” from your admin area.
2) On the page that opens, find the “AI Assistant” addon in the “Disabled Addons” section and click on the “Settings” button.
3) There are the following fields on the page that opens, and you must define this information according to yourself:
OpenAI API Secret Key : Define the “OpenAI API Secret Key” information of your own account. You can visit the link below to obtain OpenAI API Secret Key information.
https://platform.openai.com/api-keys
When you click on the link above, log in to your Open AI account and click on the “Create new secret key” button on the page that opens. Type “FOR WISECP” in the “Name” field and click the “Create secret key” button. Copy the KEY information and paste it into the “OpenAI API Secret Key” field in the addon settings.
OpenAI Model : Select which one you want to use as the AI model. (“gpt-3.5-turbo” recommended.)
Access Control : Set administrator privileges to grant access to the addon.
4) After defining the above information, click the “Save” button and then click the Enable button at the top of the page to activate the addon.
Use and Working Principle
AI Assistant is a unique support assistant powered by "OpenAI-ChatGPT". Its use and working principle are extremely simple and easy.
AI Database
AI Assistant has its own database and generally, to respond to messages, it reviews the database to see if there are any responses that may be related to the incoming message. If there is any response related to the customer message in the database, it instantly finds it and presents it to you.
If no content related to the customer's response can be found in the AI database, AI Assistant alternatively reviews all support ticket messages stored in your system database and searches for a suitable response. If it finds any suitable response in your support message archive, it will display it or list it as an alternative message.
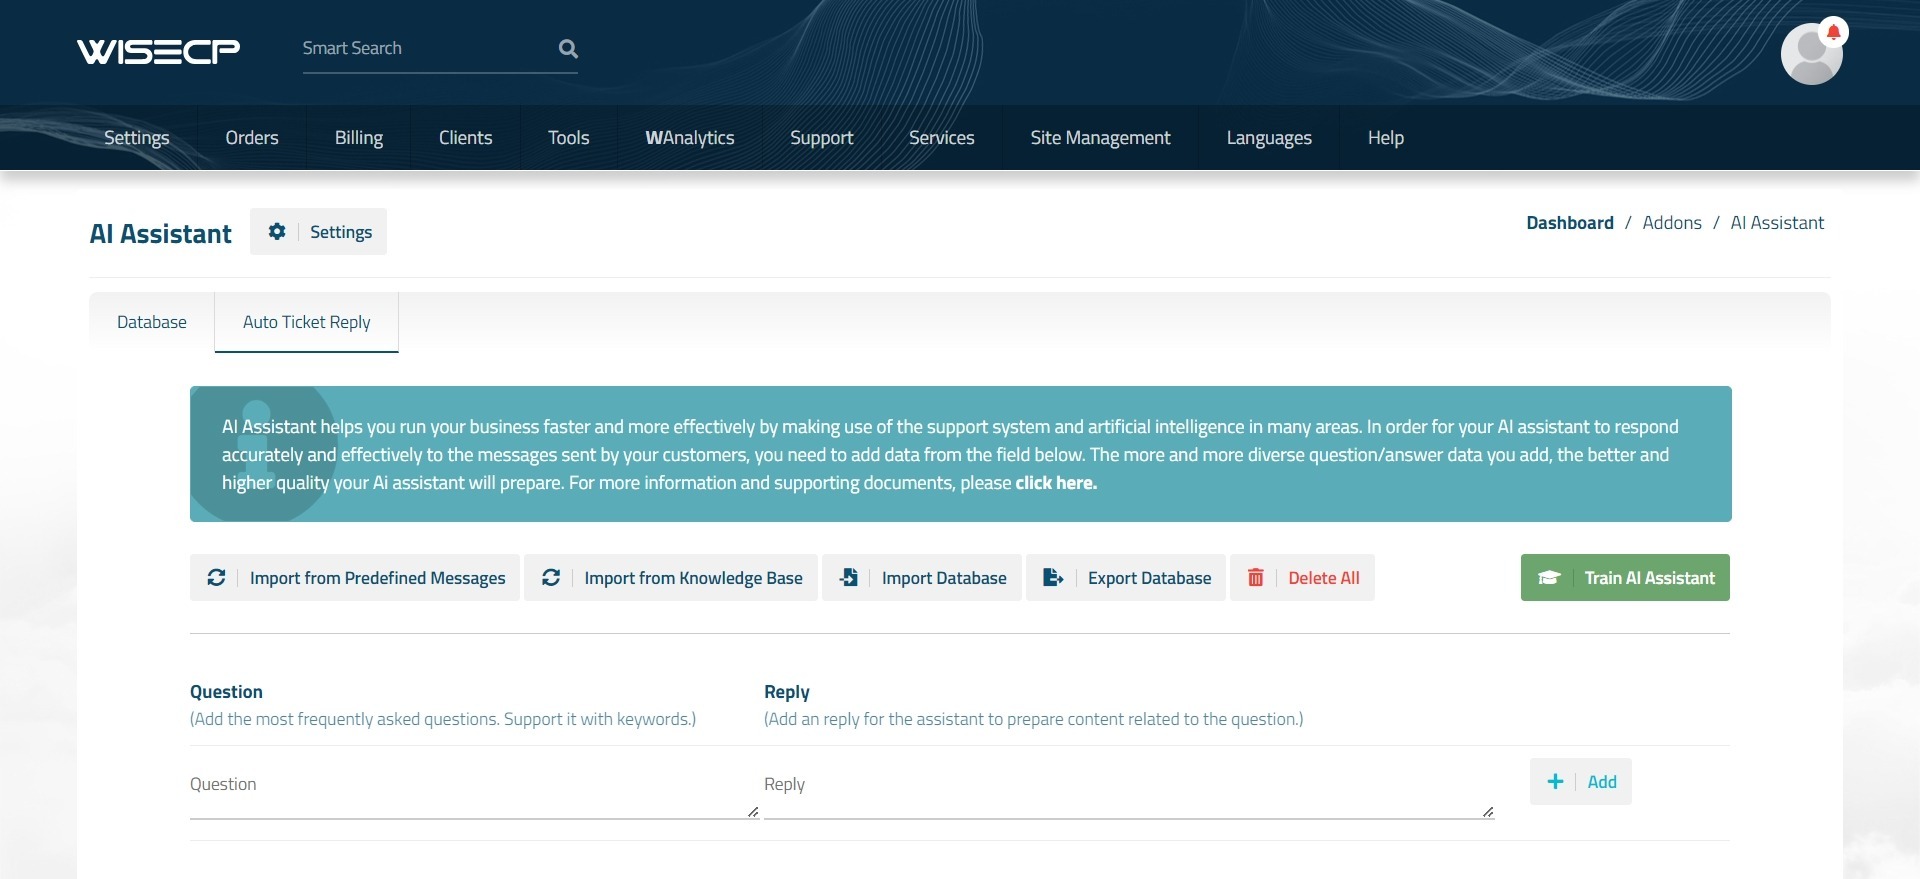
You can access and manage the database from your admin area via "Support > AI Assistant". (The first page you see is AI Database.)
Adding Content to the AI Database
You can automatically import "Predefined Reply" and "Knowledge Base" articles that you have previously created in your support system into the AI database. This process takes place within seconds. If you wish, you can also add content manually using the "Question/Answer" logic.
Additionally, you can train the AI Assistant by preparing a response to the customer message yourself via the support ticket or contact form, and enable the AI Assistant to respond to the same type of messages in the future.
When adding content to the AI database or training the AI Assistant through support messages, you should use keywords as much as possible in the response text.
For example, if the customer's message is as follows:
Client:
Hello,
How can I add a new subdomain to my hosting service?
Best regards.
When adding this as a “question” to the AI database or training the AI Assistant, you need to revise it as follows:
How can I add a new subdomain to my hosting service? Creating a subdomain, adding a subdomain
Similarly, you can add keywords with the same logic in other messages. Since only you and the AI Assistant can see this text, use keywords related to the answer as much as possible. In this way, the AI assistant can obtain better and more accurate results thanks to the relevant keywords.
When adding content to the database or training the AI Assistant, remove unnecessary words in the customer message as much as possible. This helps in achieving better and effective results. (For example, words that need to be deleted: Hello, How are you, Thank you, Best regards, Kind Regards etc.)
Using AI Assistant in Support Tickets
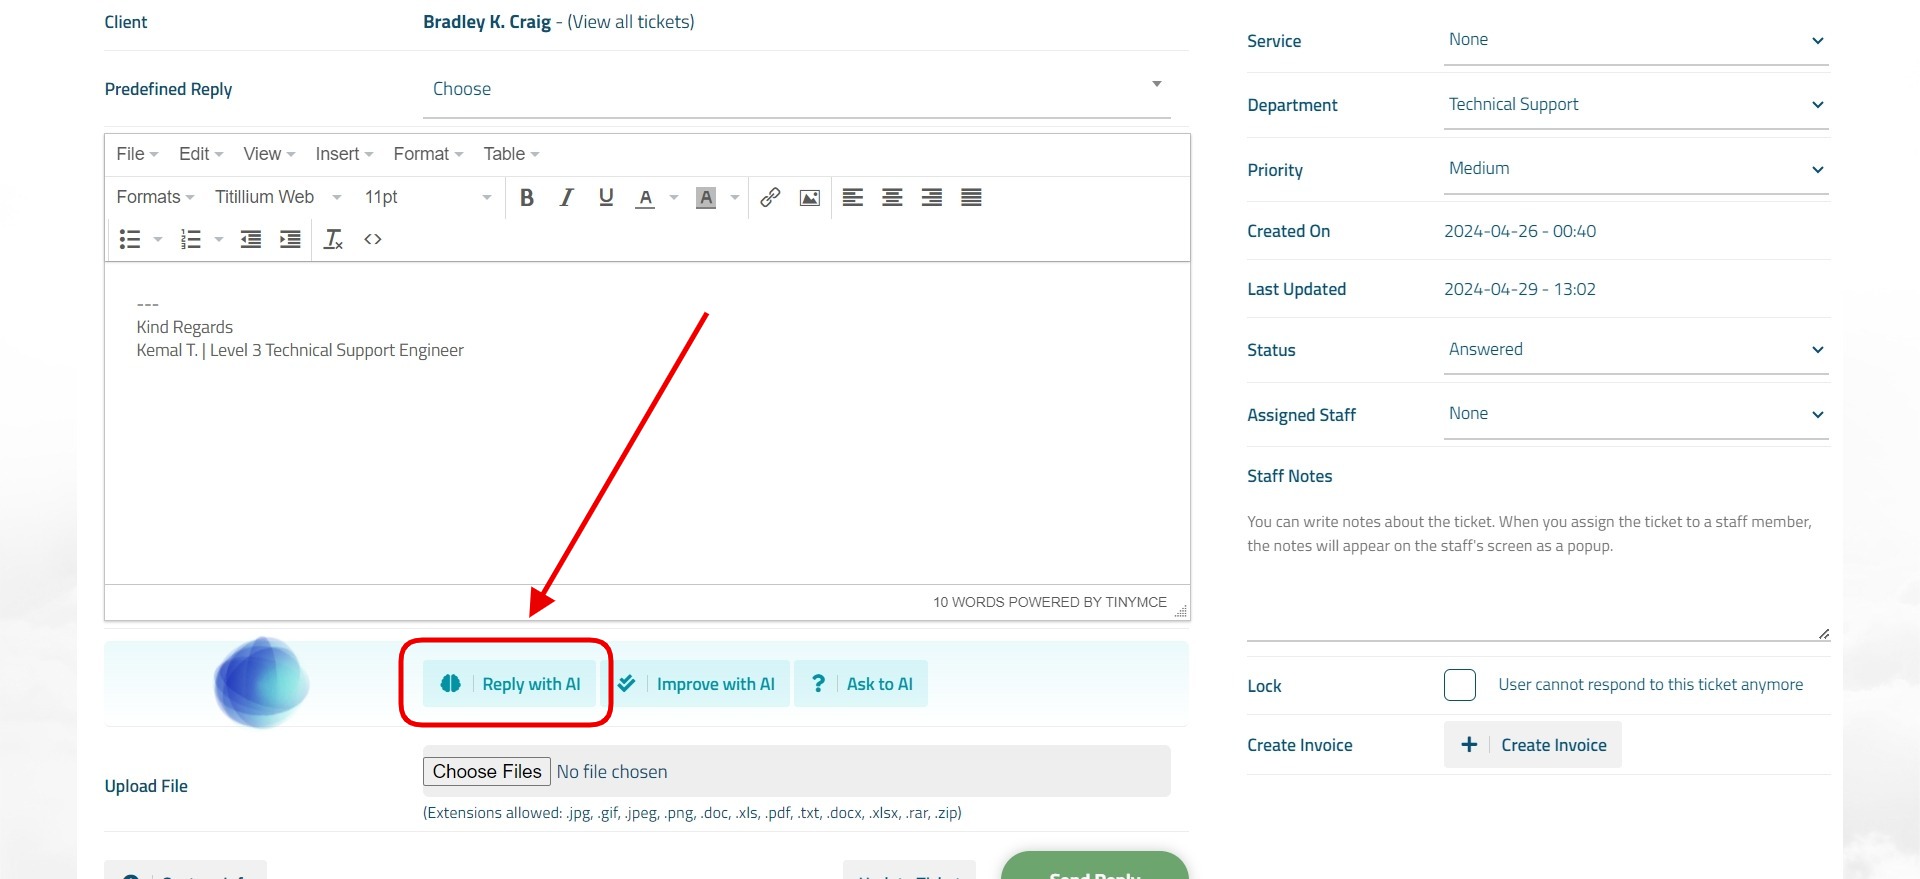
When your customer creates a new support ticket, you can access the AI Assistant by clicking the "Reply with AI" button in the support ticket detail.
Reply with AI
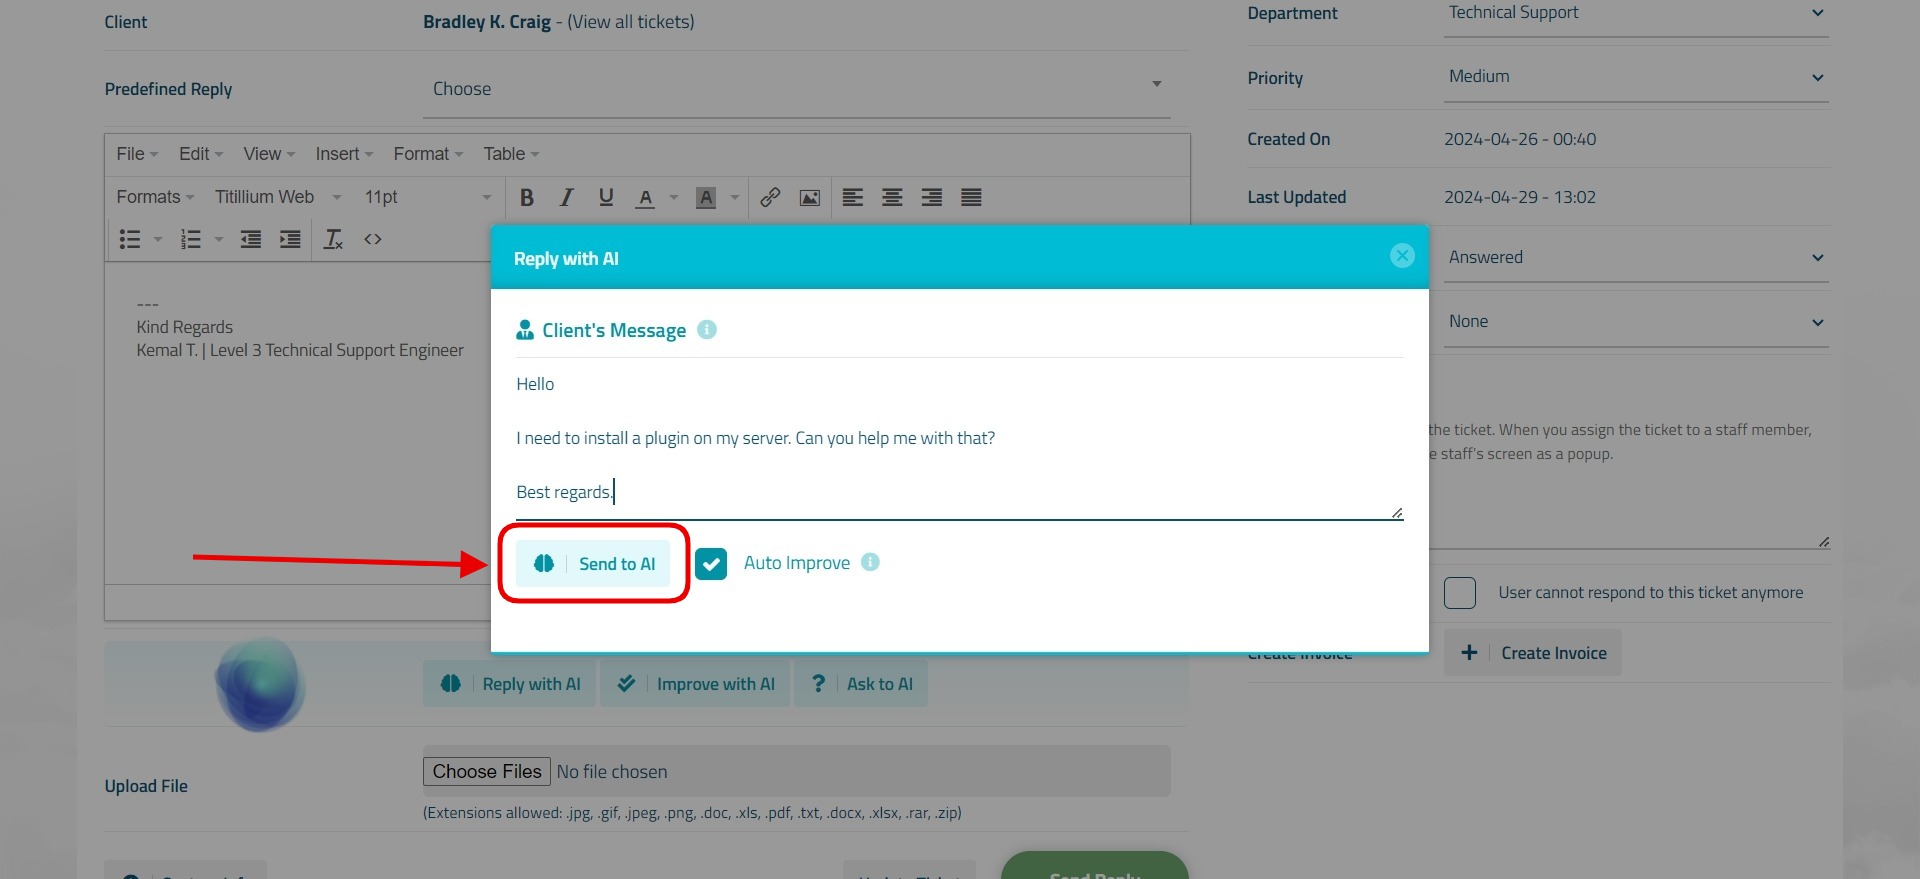
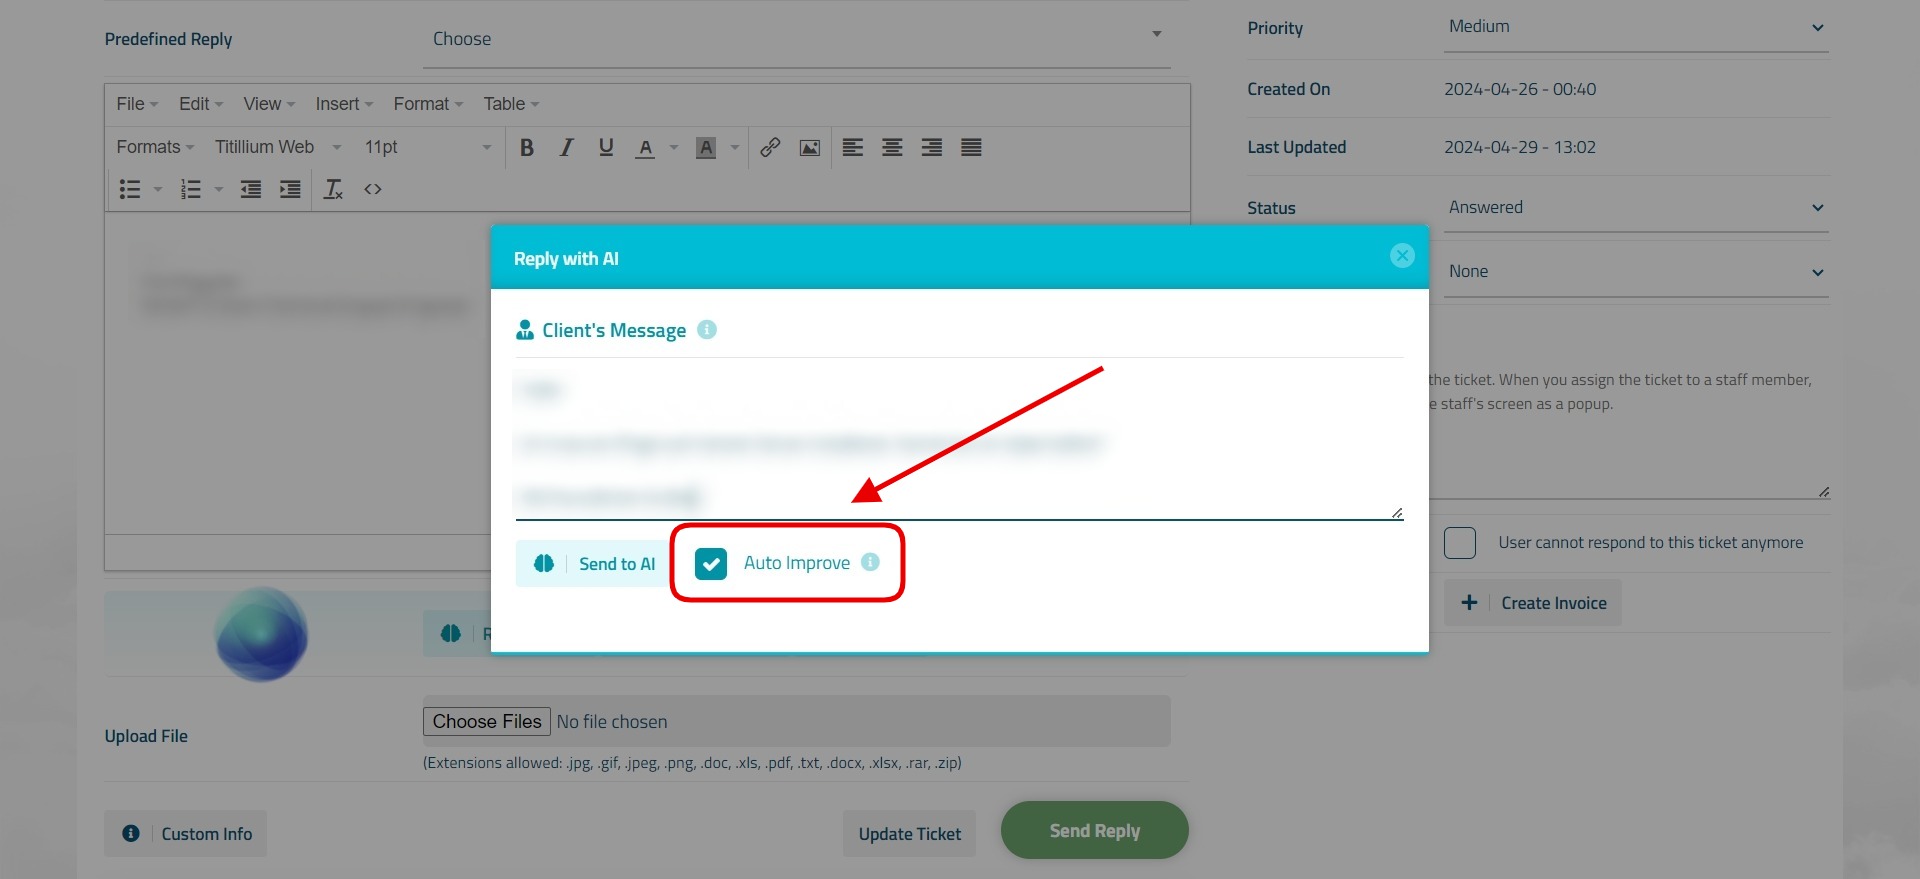
When you click on the “Reply with AI” button, the AI Assistant window will open. In this window, the "Client's Message" field is first displayed at the top. This field contains the exact text that the customer wrote when creating the ticket. When you click the “Send to AI” button below the message, the customer's message is sent to the AI Assistant and an appropriate response is expected to be prepared by the AI Assistant. AI Assistant takes the main words in the customer's message and first scans it in the database. If there is no suitable content, it scans all personnel messages in the support ticket system. As a result, if a suitable answer is found, it will show you.
For better and more effective results, we recommend deleting all unnecessary words in the customer message field and adding potential keywords. In this way, the keywords you enter directly will be searched in the ai database and in the ticket archive of the support system to find the appropriate results.
If no result is found, an information message stating that no suitable result was found is displayed. But just in case, alternative replies are also listed so you can see potential replies. This is a list of replies that the AI Assistant is unsure of and that you should see.
Auto Improve
When you use this function, the response text will be automatically enhanced by AI Assistant. Spelling errors, if any, are corrected in the text and a more professional and corporate appearance is given. However, when using this function, it takes longer than usual to prepare the response text.
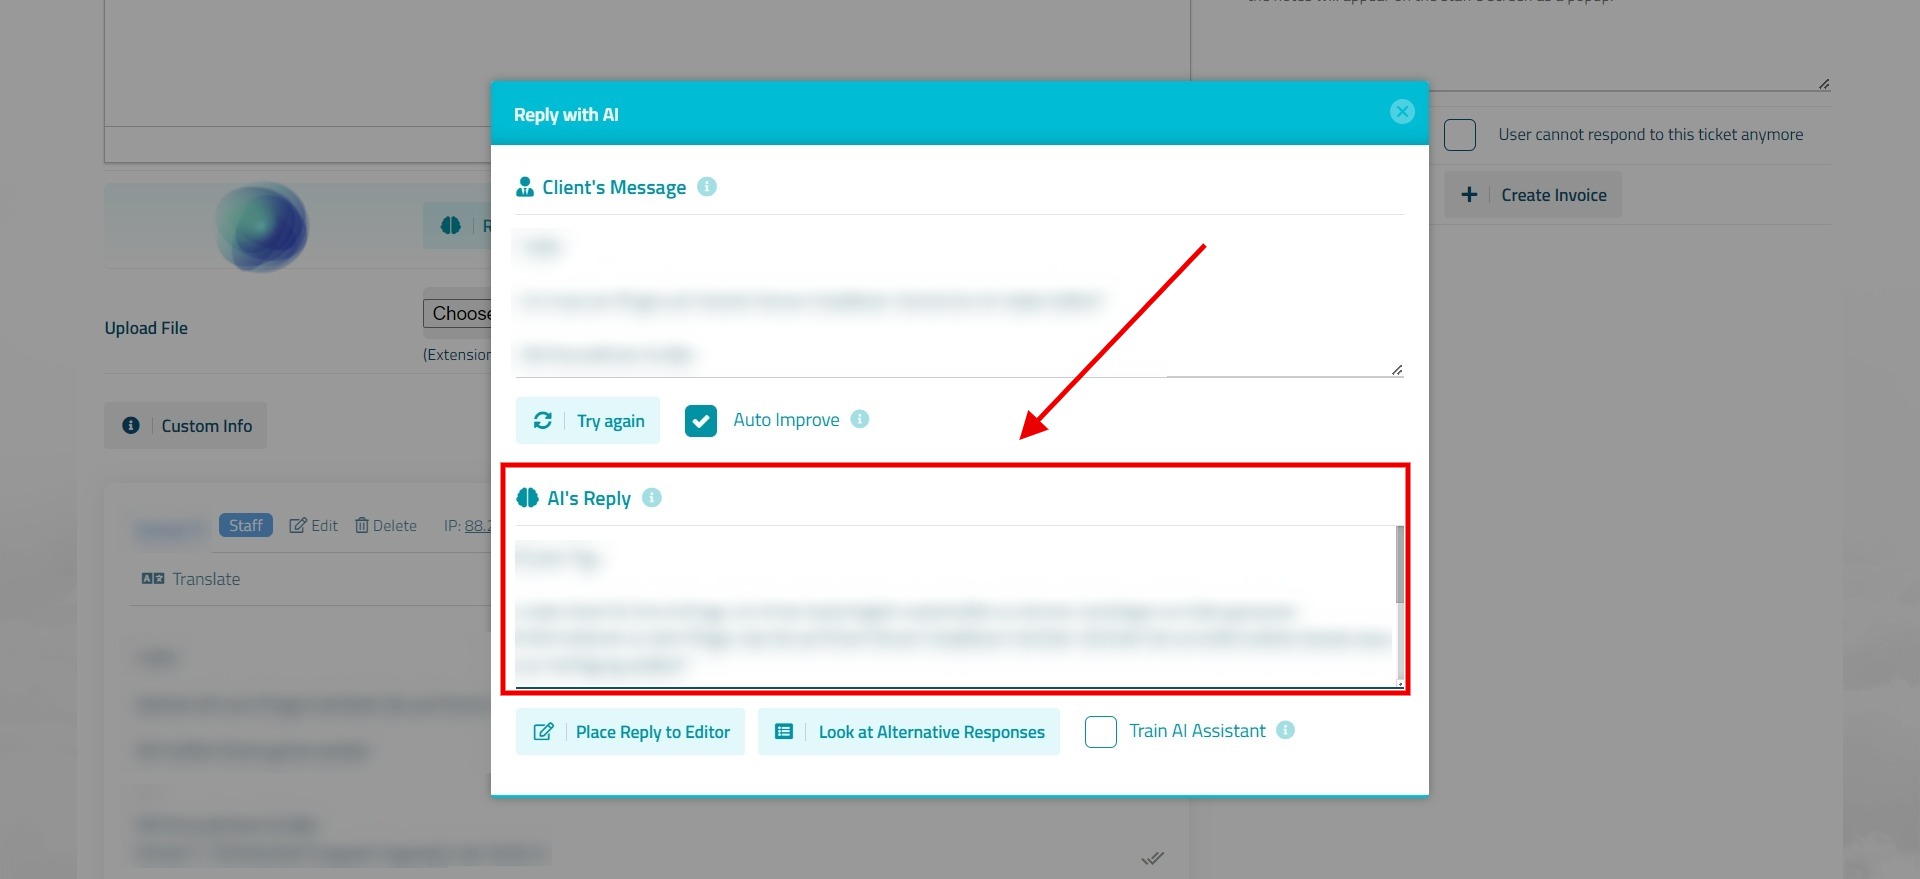
AI's Reply
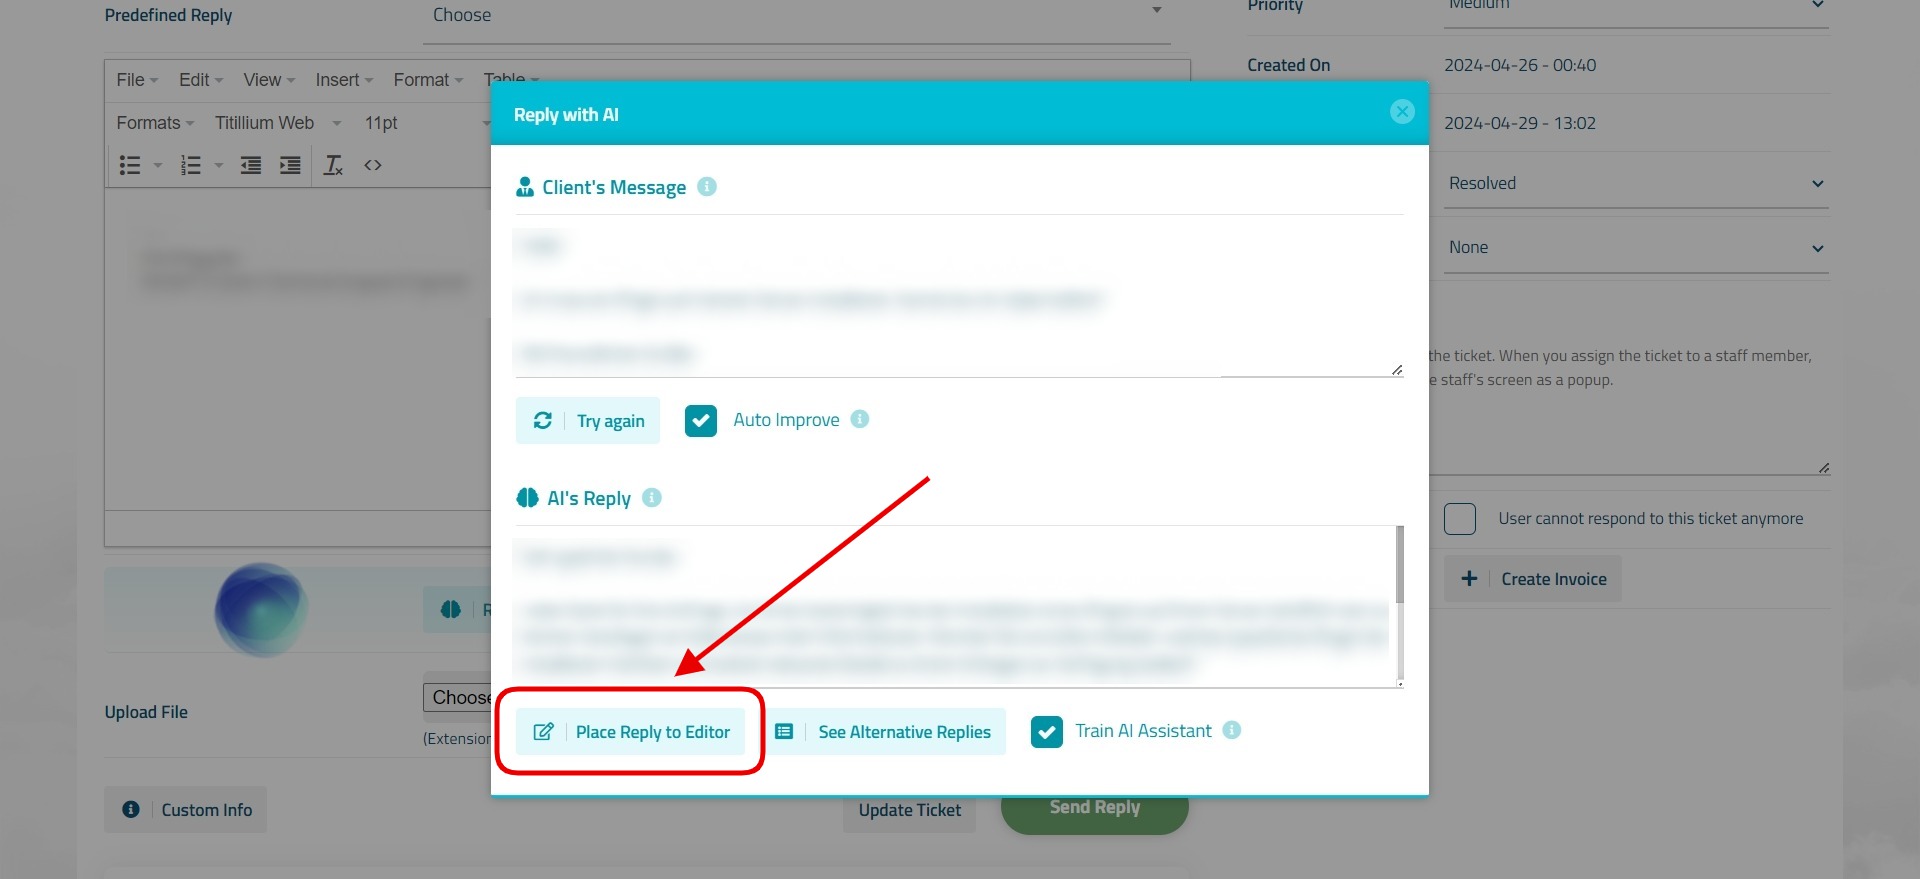
When you click on the "Send to AI" button, the AI Assistant will search the database and the support system response archive to find a suitable response to the customer's message, and if a suitable response is found, it will be displayed in the "AI's Response" field. If you wish, you can also edit the response and then click the "Place Reply to Editor" button to send the response to the customer.
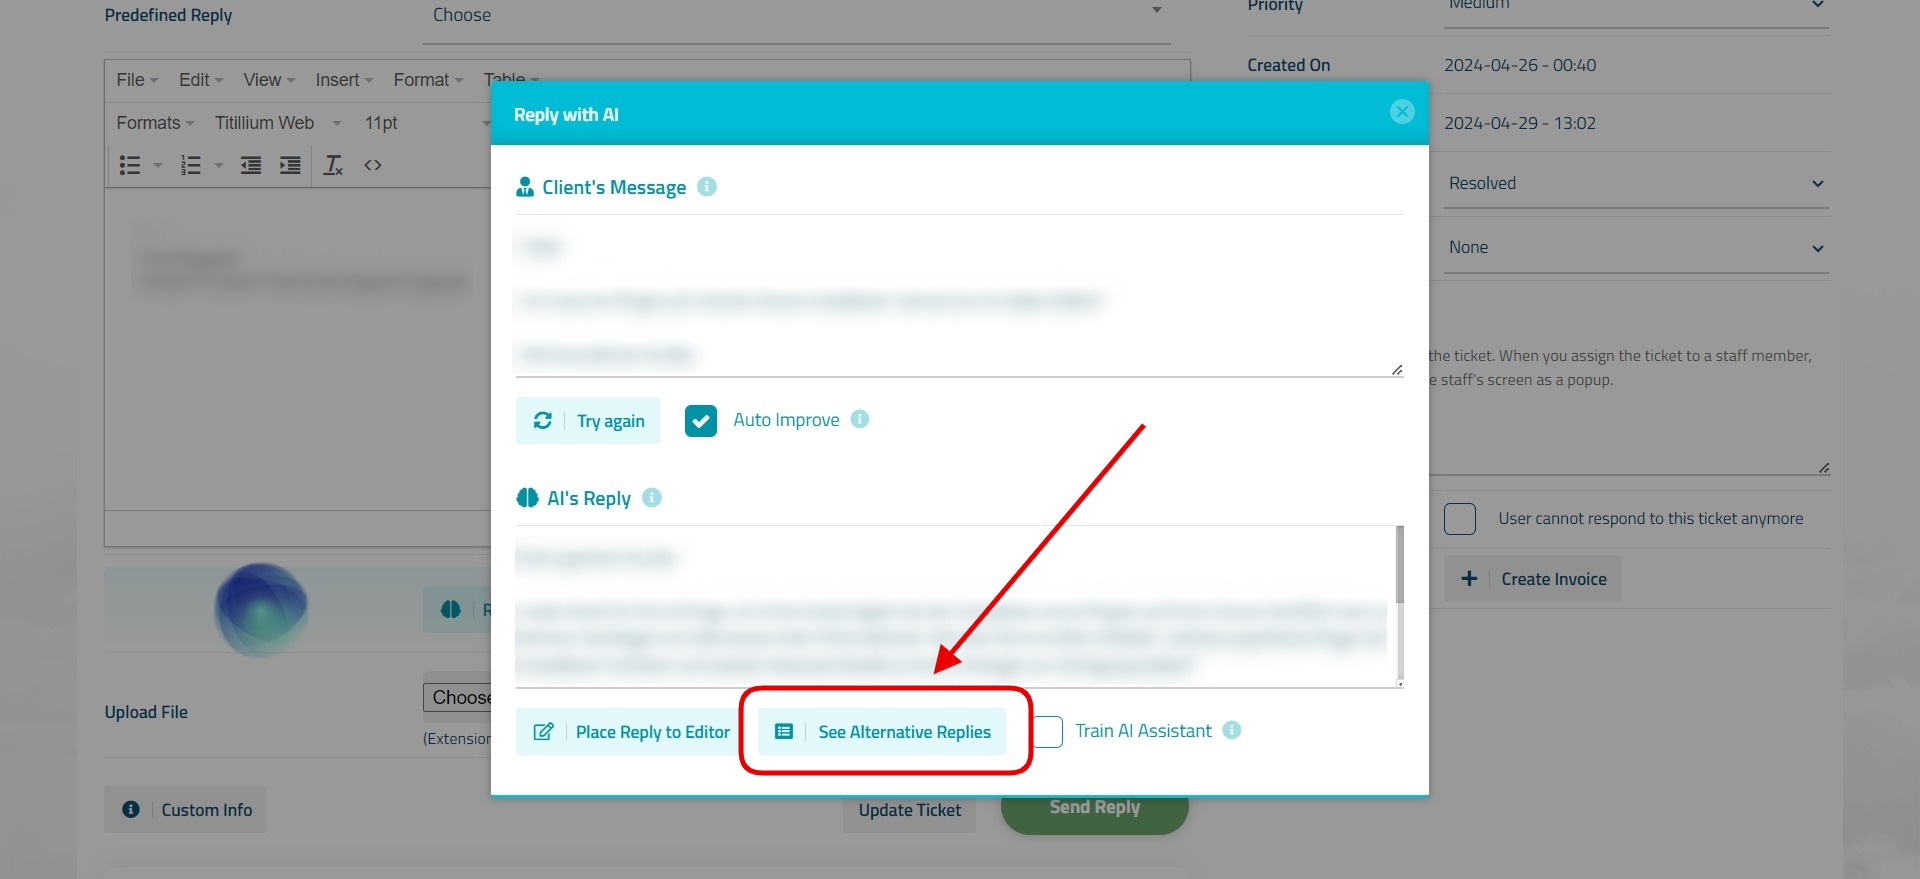
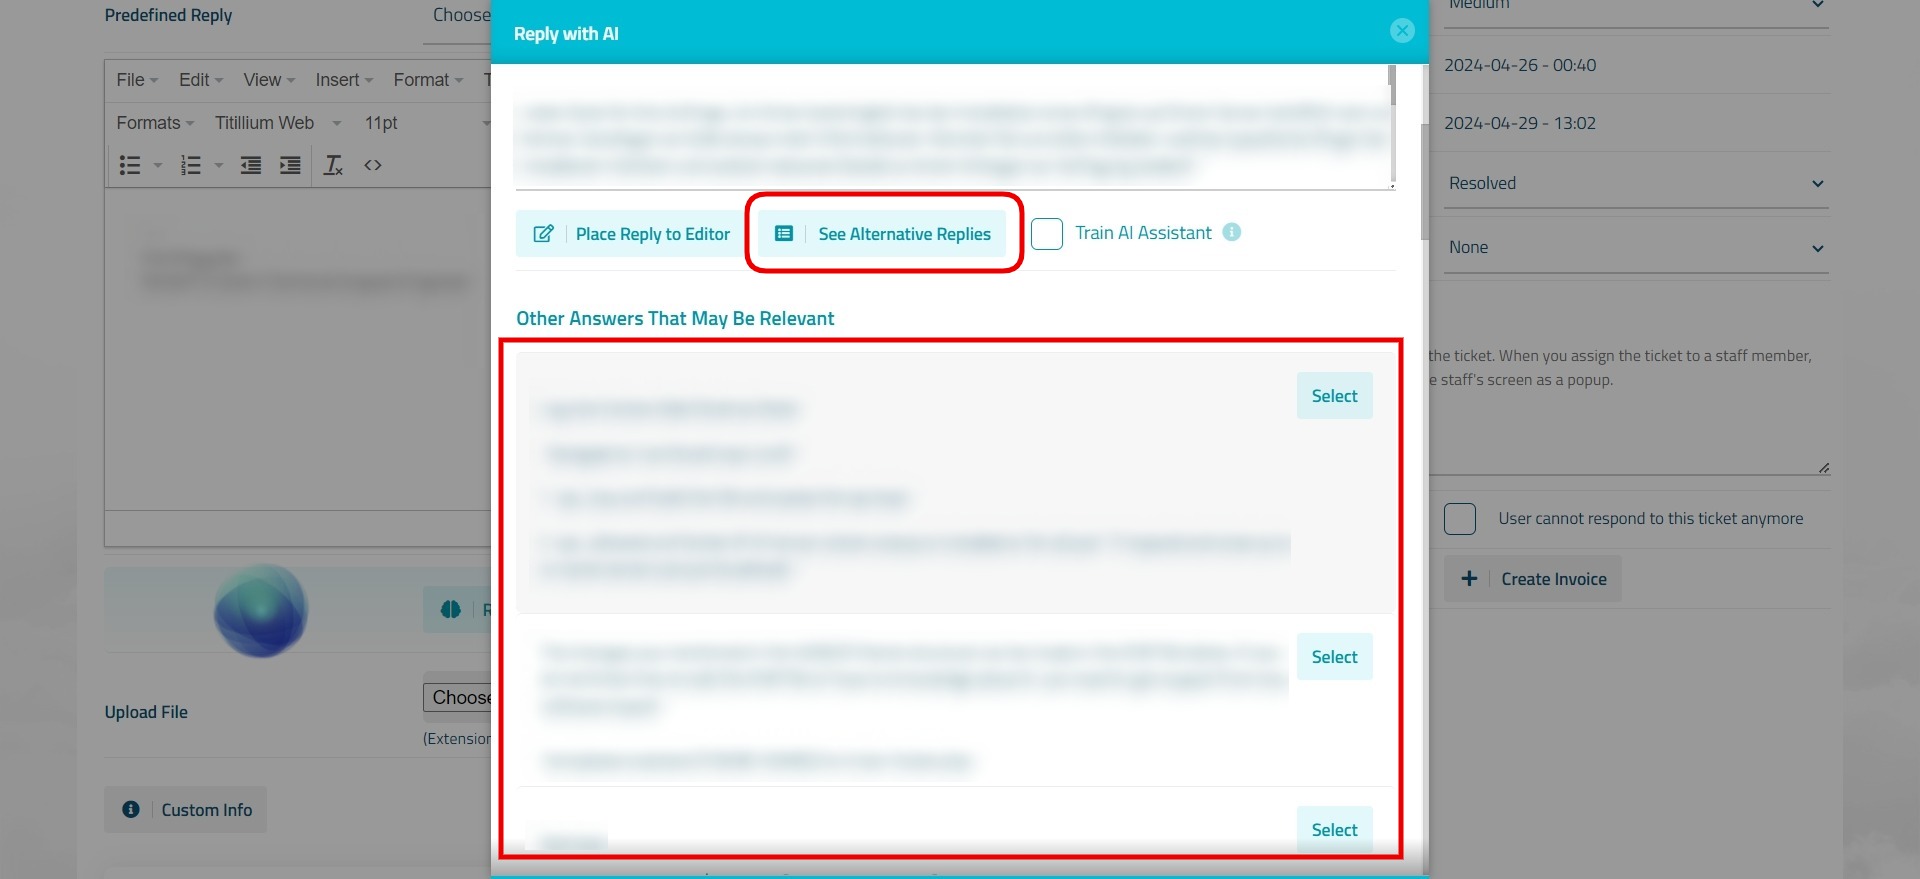
See Alternative Replies
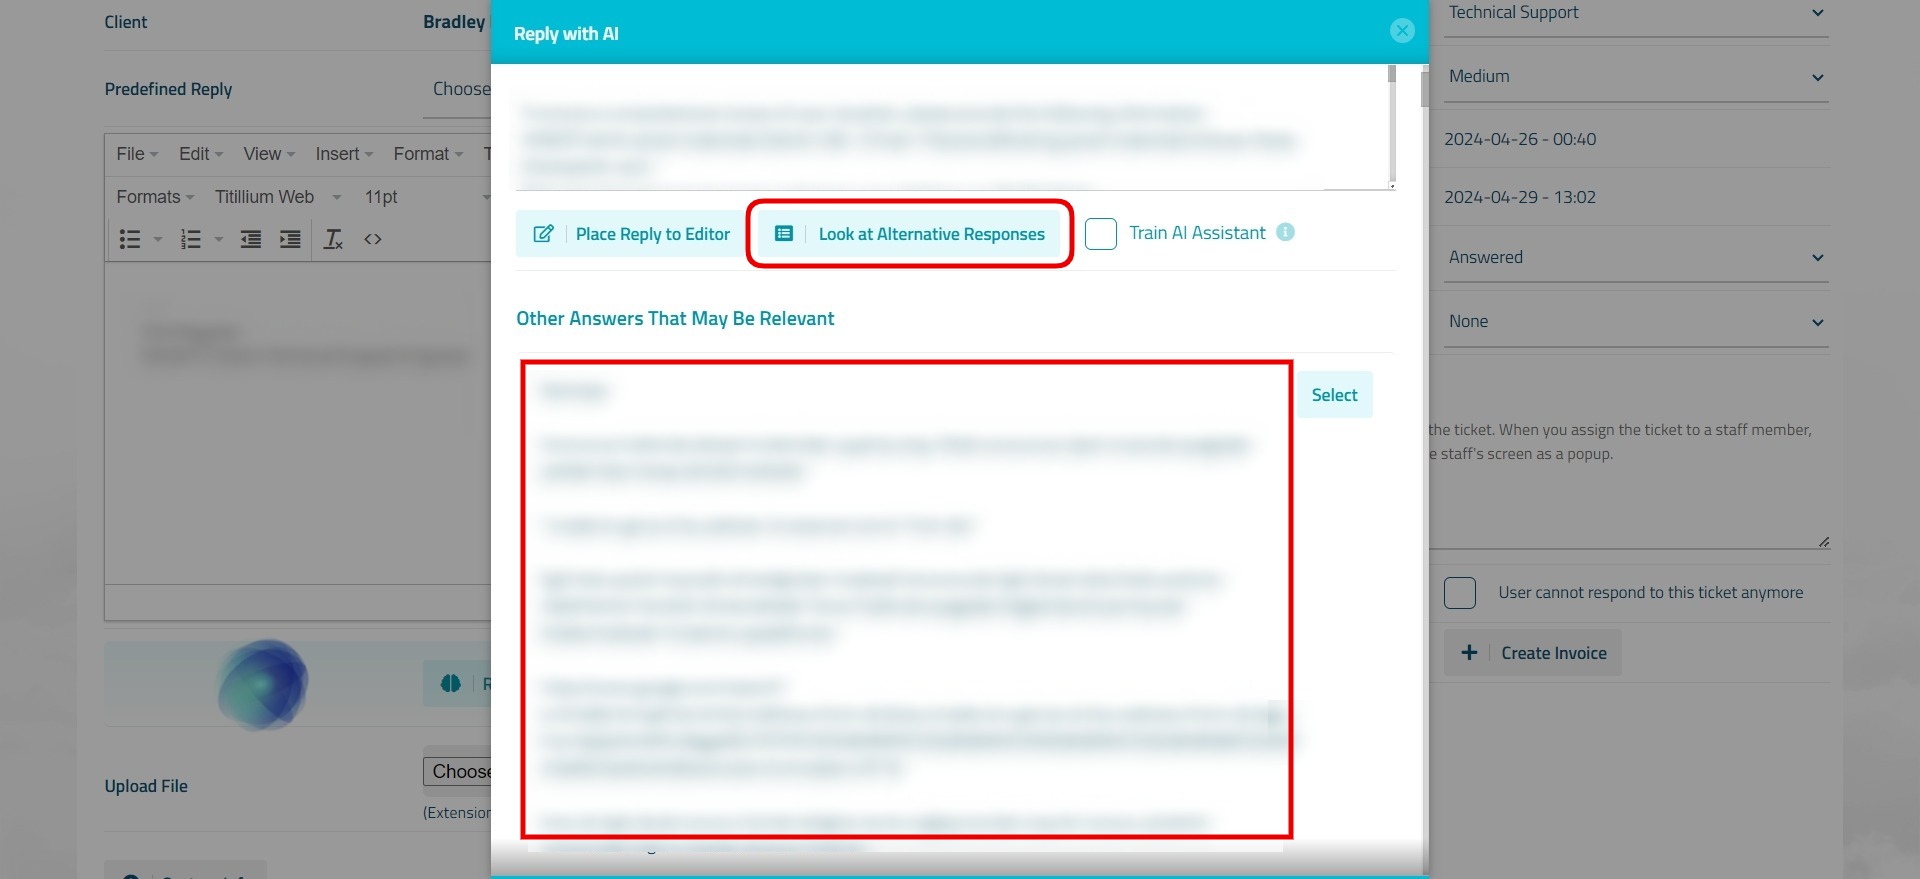
The message returned in the “AI's Reply” field may not be what you expected in some cases. In such cases, you can click the “See Alternative Replies” button in the window. When you do this, you can also see other potential responses found for the customer response. Perhaps the answer you are looking for may be among the alternative replies.
Train AI Assistant
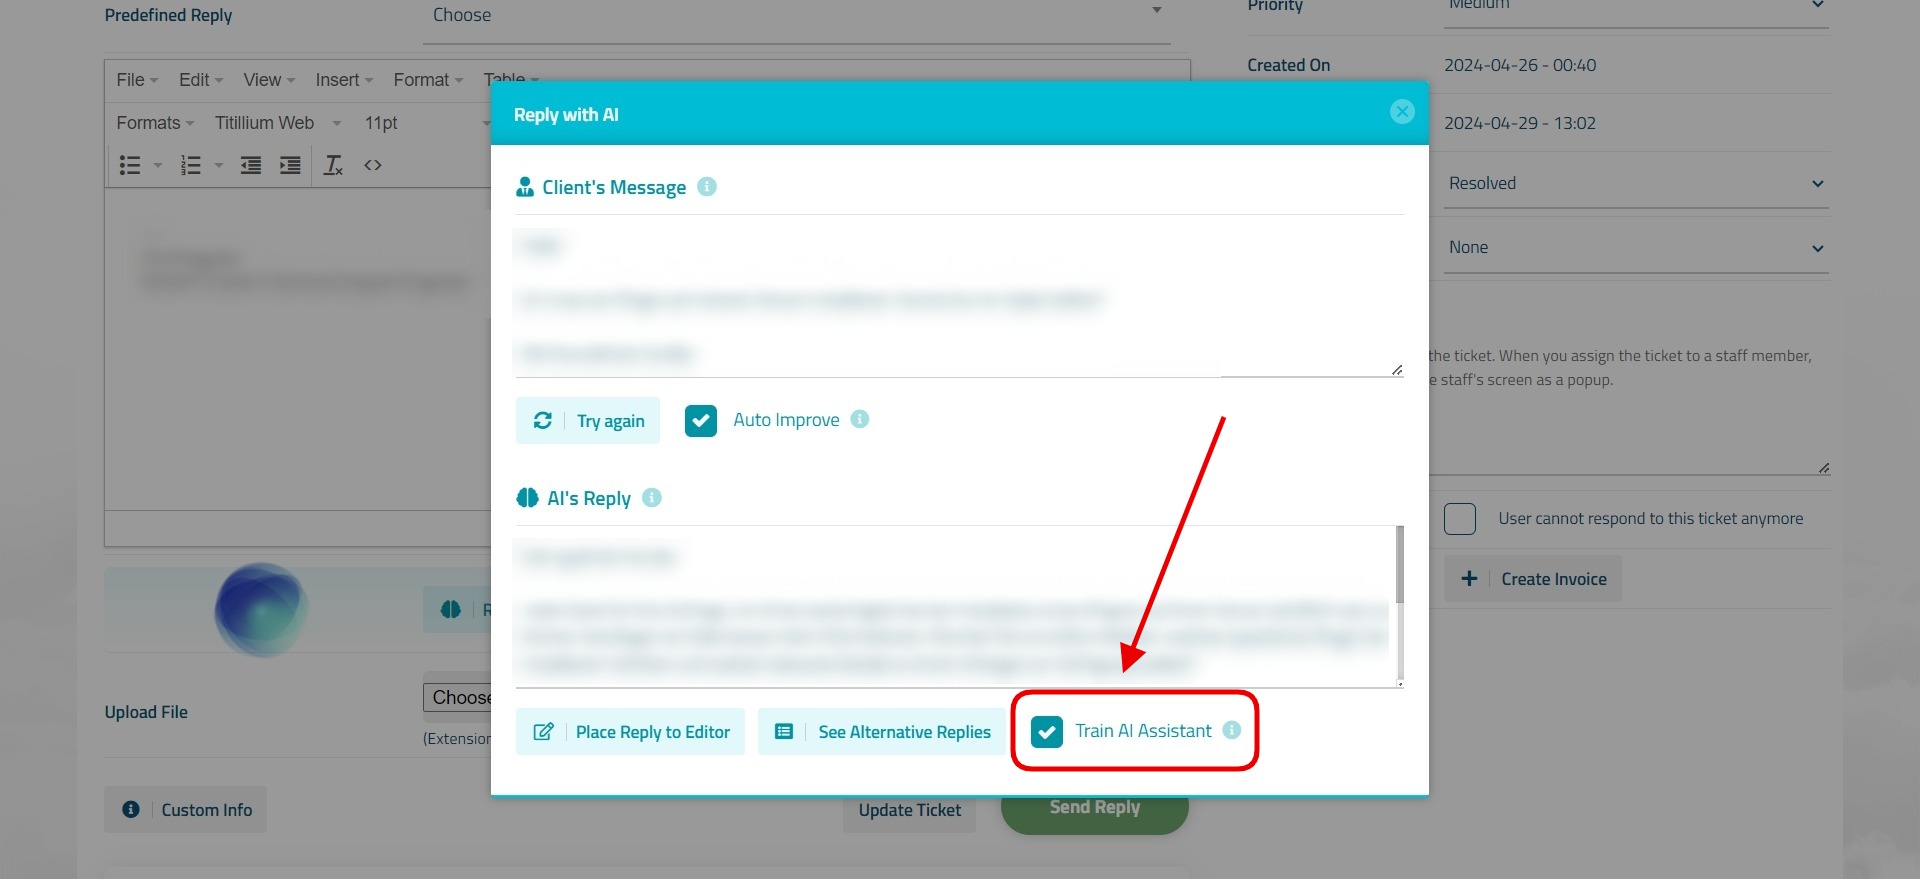
If no suitable answer can be found either in the AI database or in the support system ticket archive, then you can prepare the response yourself and train the AI Assistant so that the response you prepared can later be easily found by the AI Assistant. For this, you can write a response text yourself by completely deleting the text in the “AI's Response” field. Before placing the text you have prepared into the editor, you need to check the "Train AI Assistant" box.
In the "Client's Message" field, delete unnecessary words and add compatible keywords for the response you prepared. In this way, when you receive a message on the same subject later, AI Assistant can instantly find the response text you have prepared and present the answer to you.
Place Reply to Editor
Click the “Place Response to Editor” button to send the text found by the AI Assistant or prepared by you to the customer. Afterwards, the relevant response will be placed in the text editor. If you wish, you can also edit in the text editor.
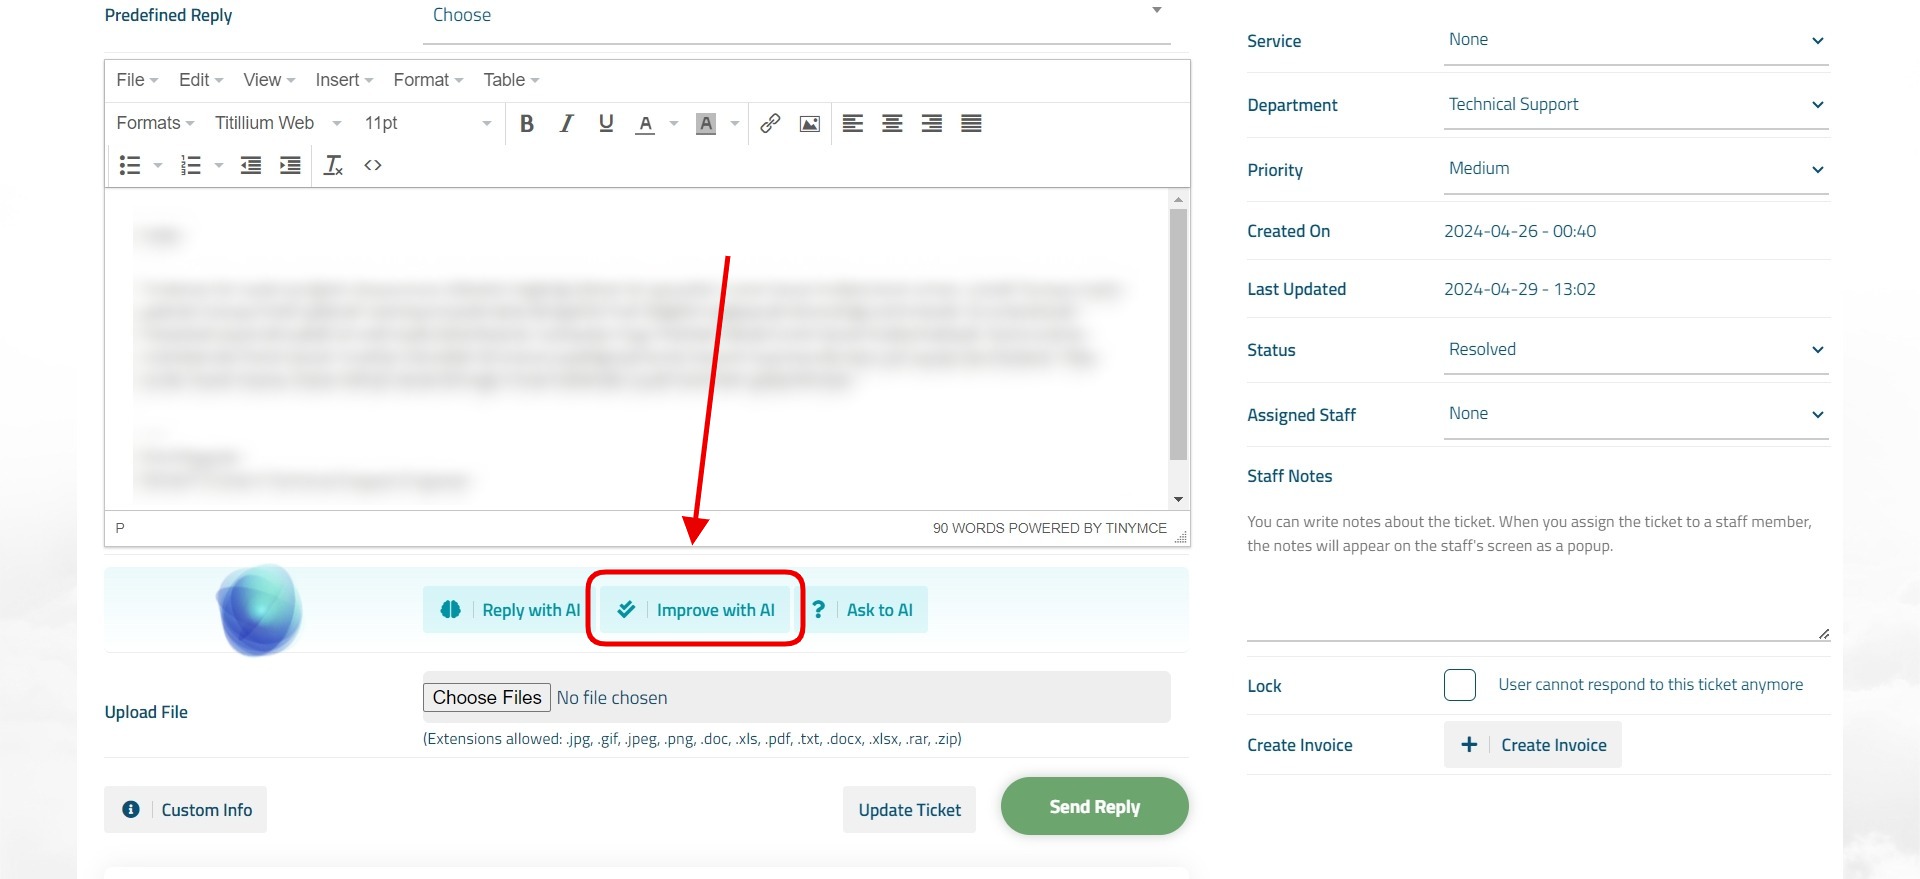
Improve with AI
If you have decided that the text to be sent will be prepared by you, you can use the "Improve with AI" feature at this point. When you use this feature, AI Assitant corrects any spelling errors in the text you have prepared and revises the text using a more professional and corporate language. In this way, the text you write is made perfect.
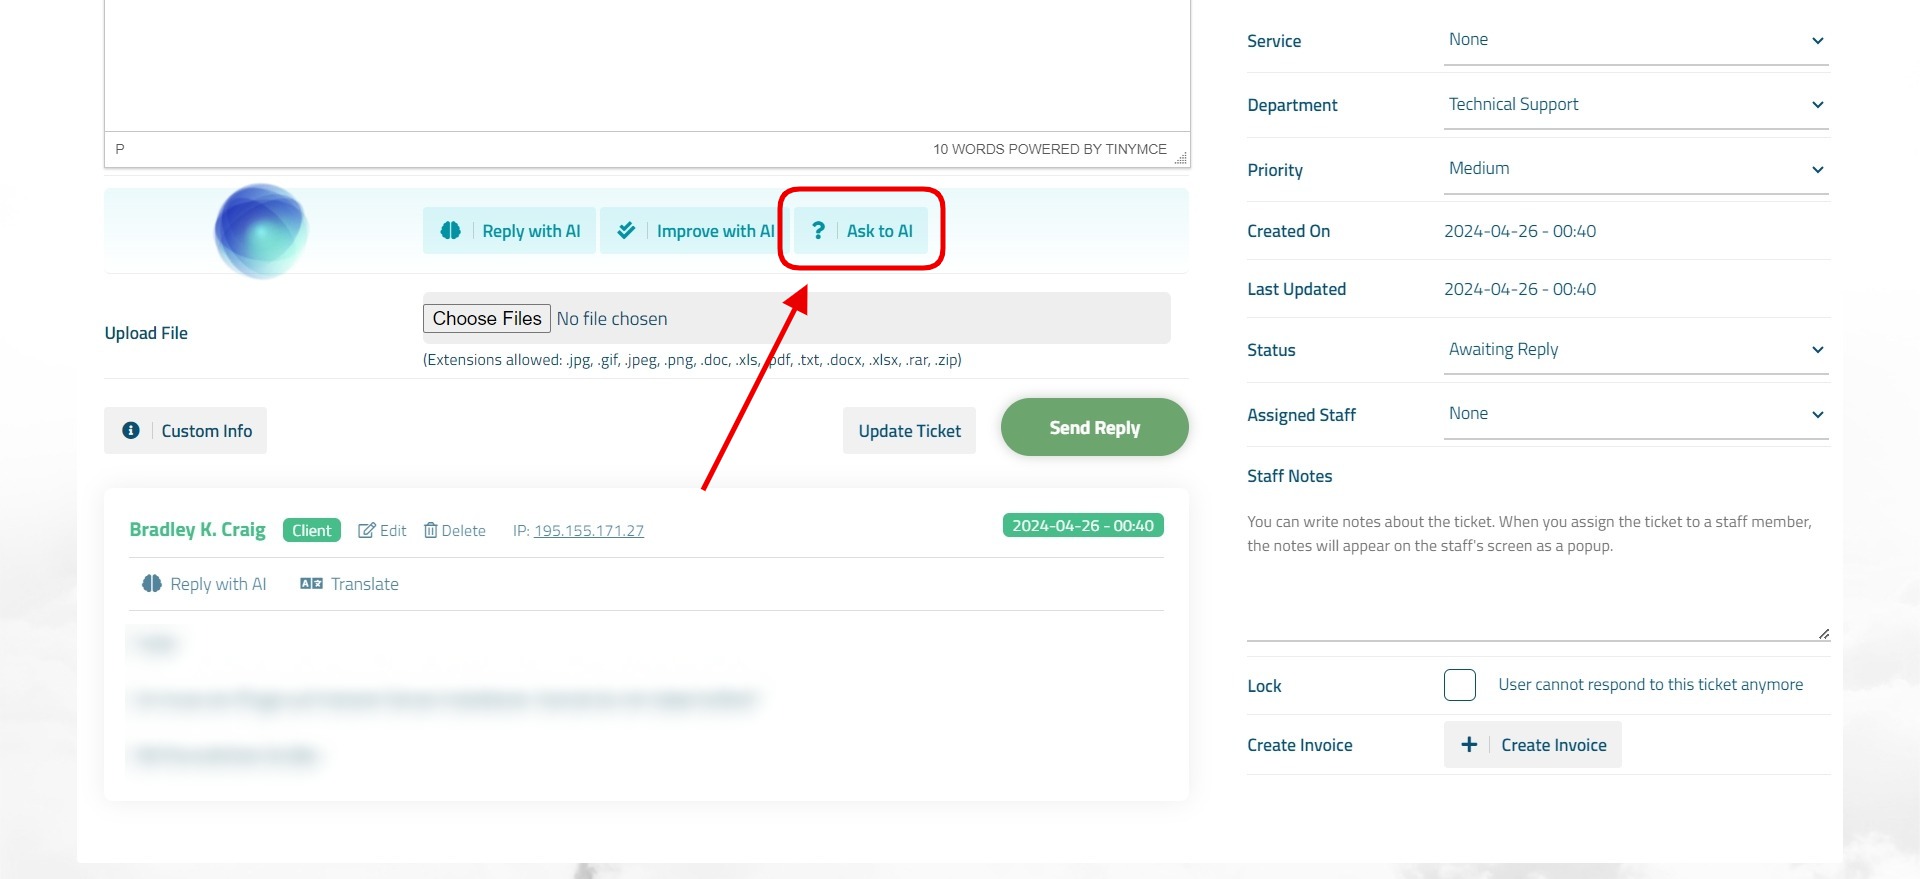
Ask to AI
In some cases, your customers may ask questions that are more specific and beyond your expertise. In such cases, you can ask questions to the AI Assistant by using the “Ask to AI” feature and inform your customers by obtaining detailed information from the AI.
Using AI Assistant in Contact Form Messages
AI Assistant can also be used to reply to messages sent via the contact form. In general, the whole process is the same as for support tickets. You can also use all the advantages provided by AI Assistant for messages sent via the contact form.
Advanced Auto Ticket Reply Feature
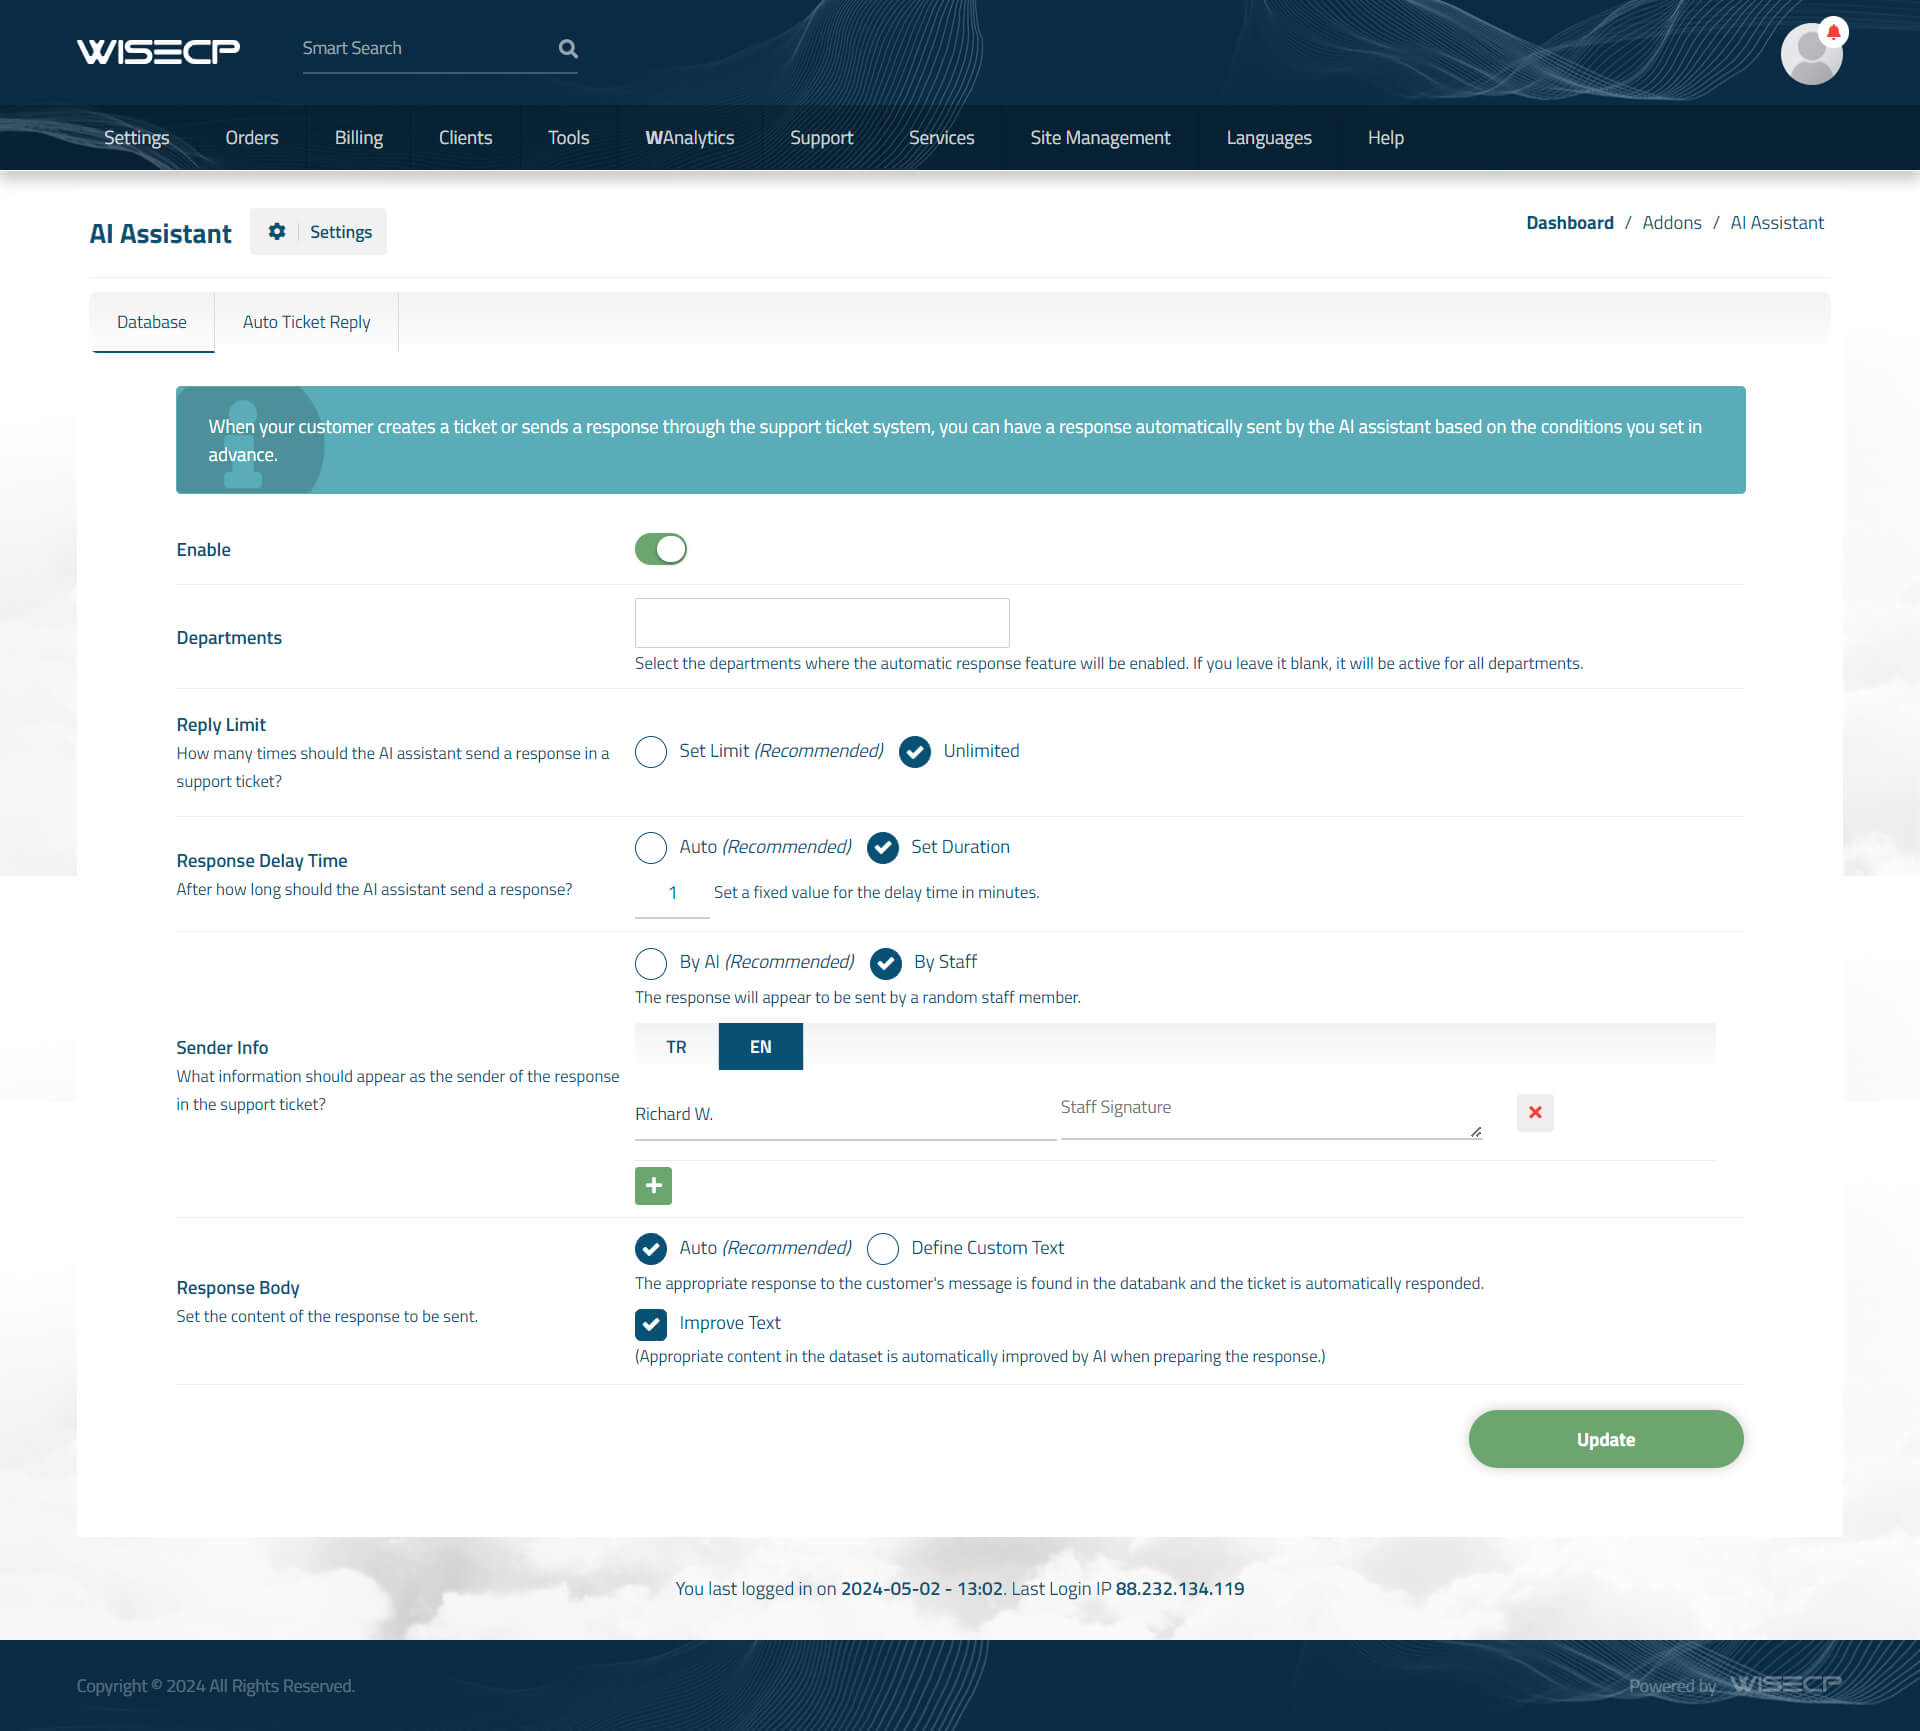
Another advanced feature of AI Assistant is that support tickets can be answered automatically by AI Assistant. In this way, while you are doing your other work, AI Assistant can find the information your other customers need from the database and provide it to your customer. Moreover, it can do this by appearing as a real employee or as a robot that sends automatic messages, depending on your preference.
In the automatic ticket reply function, if AI Assistant does not find a suitable response to the client's response, it sends a reply to the support ticket that the client's message has been received, transferred to the relevant department and will be returned as soon as possible.
The auto ticket reply feature includes the following functions:
Enable:Enable/disable the auto ticket reply feature.
Departments: It is the determination of which departments the auto ticket reply feature will be available in. It will only be available for selected departments. If no department is selected, it will be available for all departments.
Reply Limit: The number of times AI Assistant can reply to a customer message. You can set any limit or set it to unlimited. If AI Assistant cannot find a suitable response, it will send the customer an appropriate waiting message and update the status of the ticket to "in process".
Response Delay Time: This is the setting of how long after the customer sends a message AI Assistant can send a response to the customer. There are two different types, "Auto" and "Set Duration". If you choose "Auto", AI Assistant will respond to the support ticket in any reasonable time after the customer message is sent. If you choose the "Time Duration" option, a response to the ticket will be sent within a fixed period of time of your choice after the customer message is sent.
Sender Info: This is the setting for how to display who responded to the support ticket. There are two options, “By AI” and “By Staff”. Selecting the “By AI” option will show that the authorized message to be sent to the support ticket is actually sent by a robot. When you select the "By Staff" option, you can show the message as if it was sent by a real staff member. When you choose this setting, you can also define the staff name, surname and signature.
Response Body: This is the section where the text of the message to be sent to the support ticket is set. There are two different options. These are "Auto" and "Define Custom Text". When you choose the "Auto" option, AI Assistant will scan its database for possible responses to the customer message and if it finds a response that is actually compatible, it will send it as a response to the ticket. If no suitable response is found, it will send an appropriate message to the customer that the ticket is being processed and update the ticket status to "In Process" and put it on hold for an administrator to respond. When you choose the "Define Custom Text" option, you can have a fixed text that you prepare automatically sent to the ticket.

 Welcome to the Usage Guide